Description
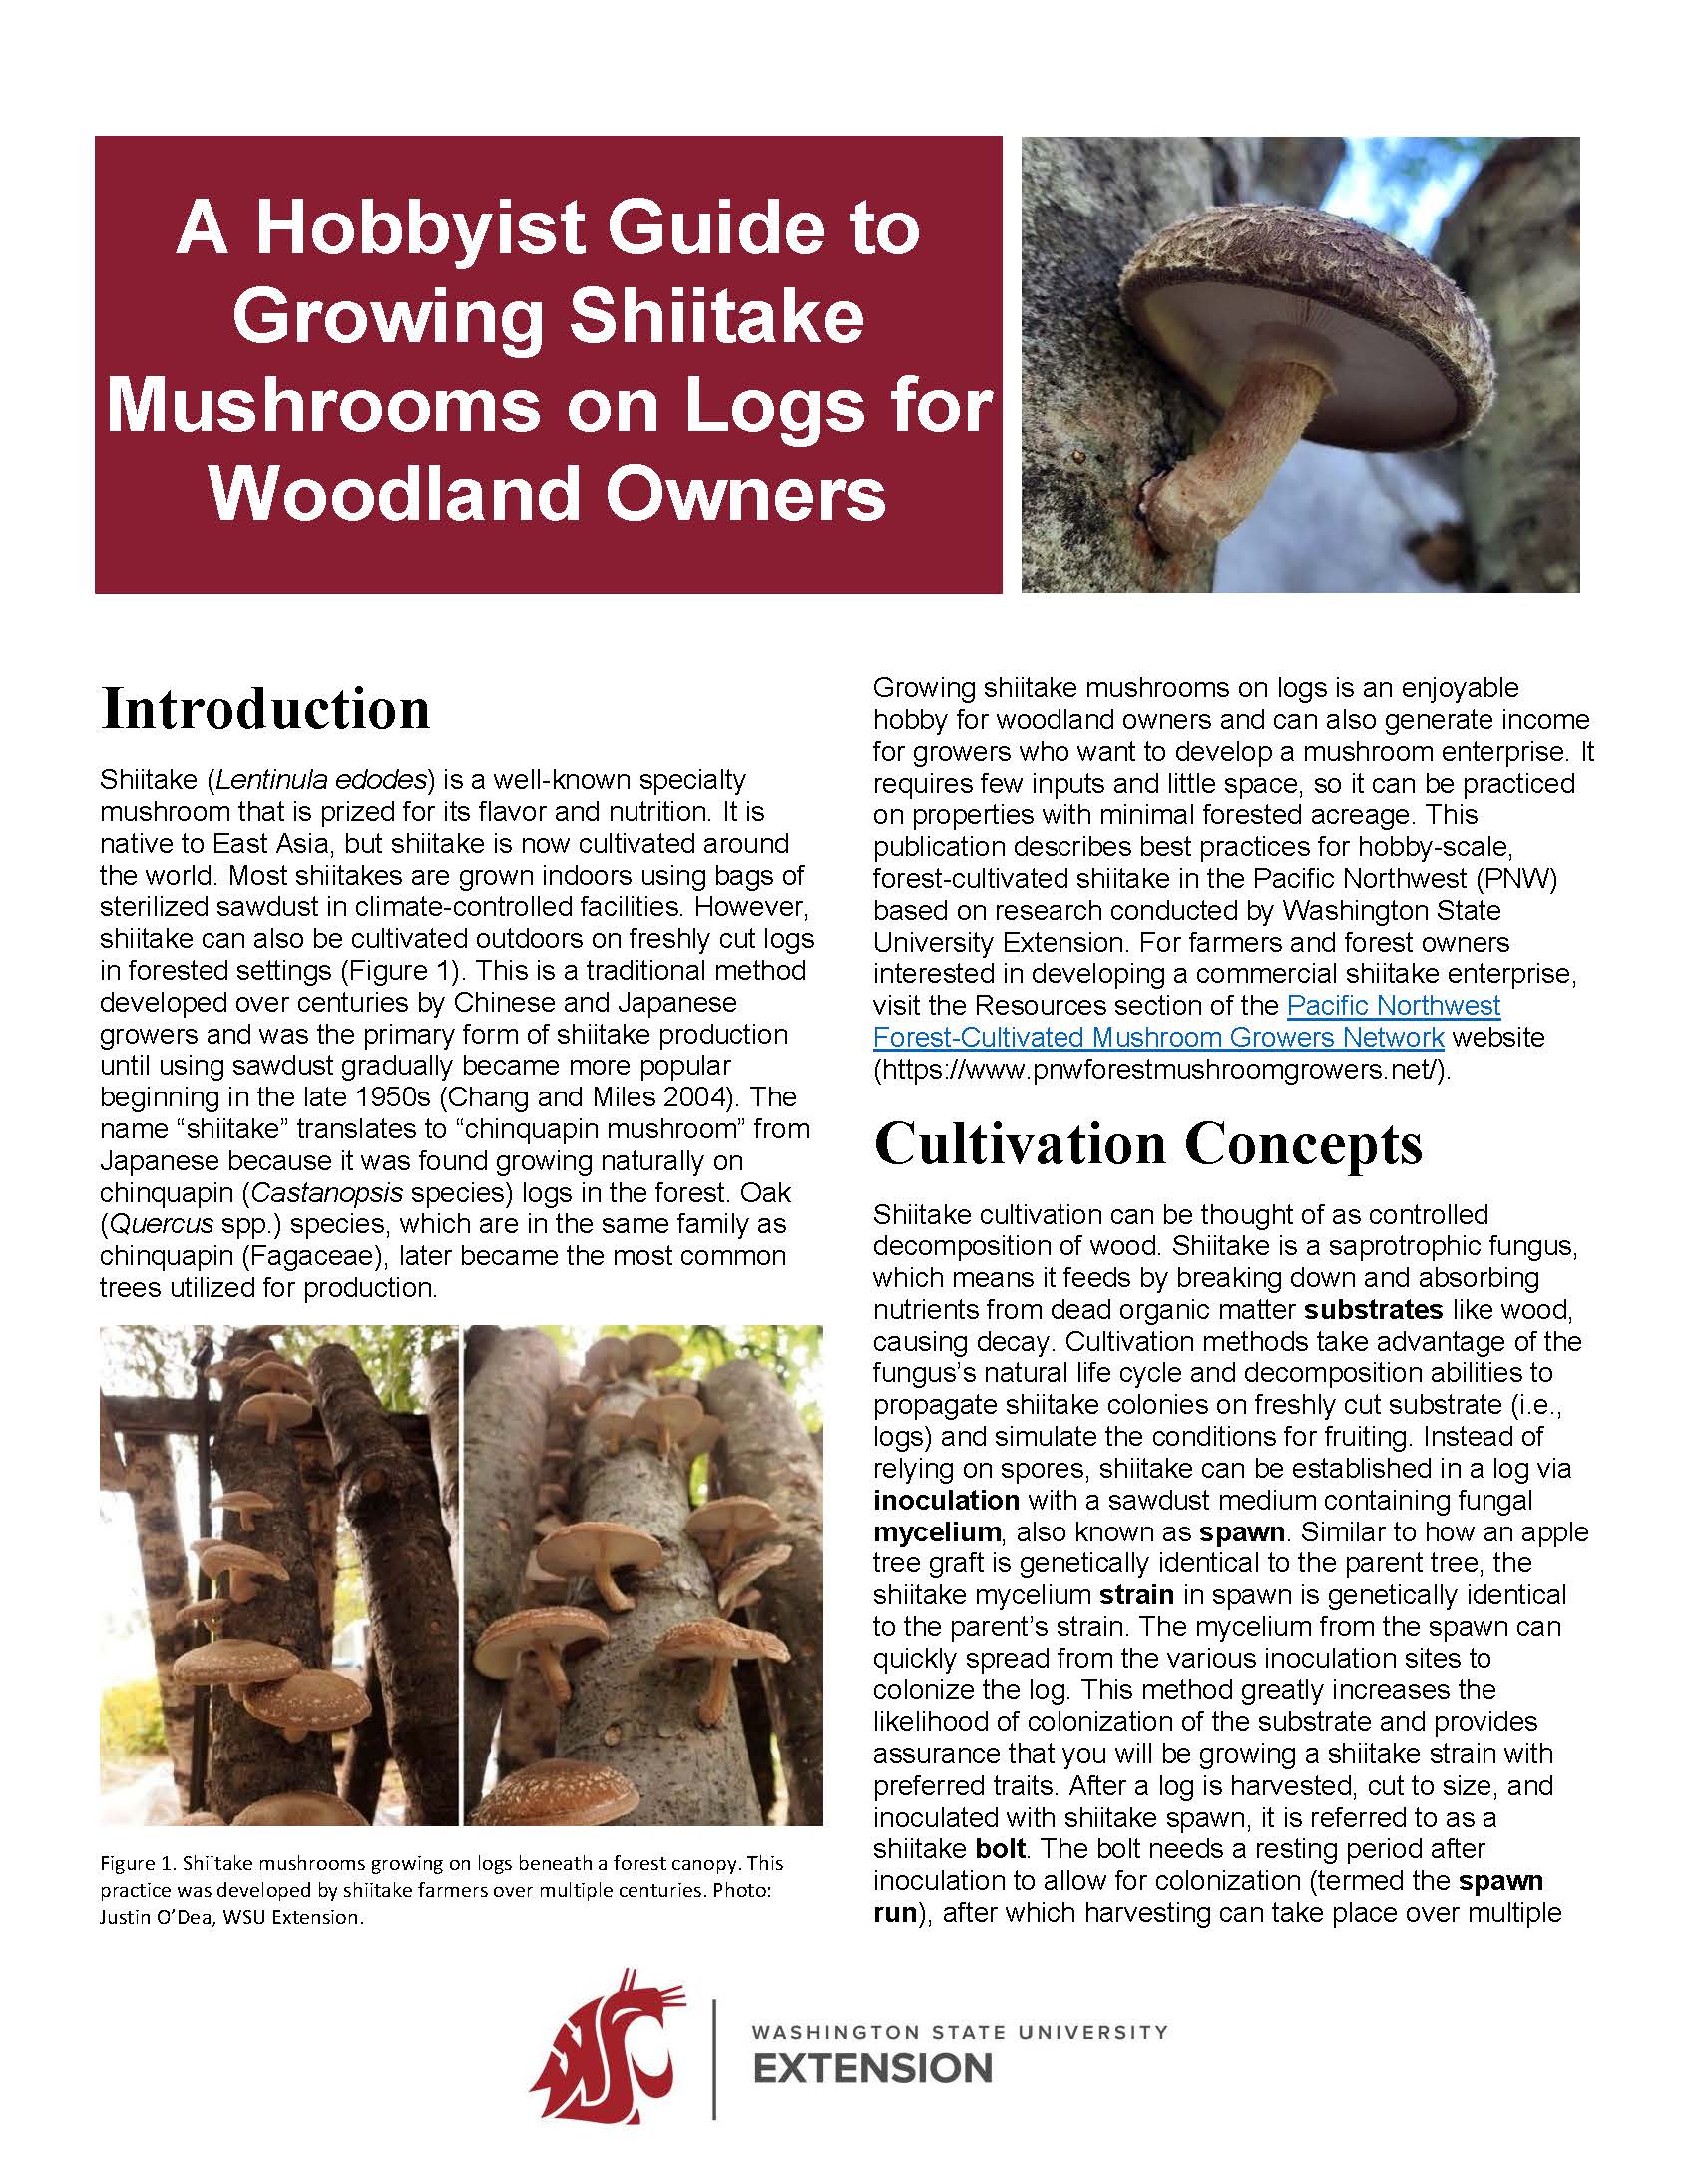
Introduction
Shiitake (Lentinula edodes) is a well-known specialty mushroom that is prized for its flavor and nutrition. It is native to East Asia, but shiitake is now cultivated around the world. Most shiitakes are grown indoors using bags of sterilized sawdust in climate-controlled facilities. However, shiitake can also be cultivated outdoors on freshly cut logs in forested settings (Figure 1). This is a traditional method developed over centuries by Chinese and Japanese growers and was the primary form of shiitake production until using sawdust gradually became more popular beginning in the late 1950s (Chang and Miles 2004). The name “shiitake” translates to “chinquapin mushroom” from Japanese because it was found growing naturally on chinquapin (Castanopsis species) logs in the forest. Oak (Quercus spp.) species, which are in the same family as chinquapin (Fagaceae), later became the most common trees utilized for production.
Growing shiitake mushrooms on logs is an enjoyable hobby for woodland owners and can also generate income for growers who want to develop a mushroom enterprise. It requires few inputs and little space, so it can be practiced on properties with minimal forested acreage. This publication describes best practices for hobby-scale, forest-cultivated shiitake in the Pacific Northwest (PNW) based on research conducted by Washington State University Extension. For farmers and forest owners interested in developing a commercial shiitake enterprise, visit the Resources section of the Pacific Northwest Forest-Cultivated Mushroom Growers Network website.
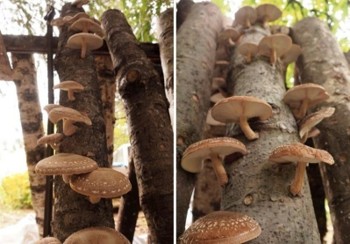
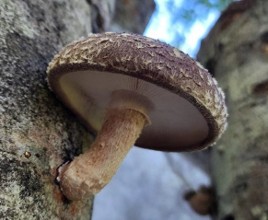
Figure 1. Shiitake mushrooms growing on logs beneath a forest canopy. This practice was developed by shiitake farmers over multiple centuries. Photo: Justin O’Dea, WSU Extension.

Figure 2. Forest stands of young red alder can be great sources of substrate. Their tendency to grow densely creates an abundance of tall, straight, small-diameter trees. If you do not have red alder on your property, many forest owners have high-density stands and may be open to allowing others to cut trees for substrate to help reduce that density (i.e., thinning), which aligns well with both forest health and timber production objectives. Photo: Patrick Shults, WSU Extension.
Cultivation Concepts
Shiitake cultivation can be thought of as controlled decomposition of wood. Shiitake is a saprotrophic fungus, which means it feeds by breaking down and absorbing nutrients from dead organic matter substrates like wood, causing decay. Cultivation methods take advantage of the fungus’s natural life cycle and decomposition abilities to propagate shiitake colonies on freshly cut substrate (i.e., logs) and simulate the conditions for fruiting. Instead of relying on spores, shiitake can be established in a log via inoculation with a sawdust medium containing fungal mycelium, also known as spawn. Similar to how an apple tree graft is genetically identical to the parent tree, the shiitake mycelium strain in spawn is genetically identical to the parent’s strain. The mycelium from the spawn can quickly spread from the various inoculation sites to colonize the log. This method greatly increases the likelihood of colonization of the substrate and provides assurance that you will be growing a shiitake strain with preferred traits. After a log is harvested, cut to size, and inoculated with shiitake spawn, it is referred to as a shiitake bolt. The bolt needs a resting period after inoculation to allow for colonization (termed the spawn run), after which harvesting can take place over multiple years until the nutrients in the log are diminished and the colony expires. The following sections describe this process in detail.
The following terms are used throughout this publication and will help your understanding of this shiitake cultivation method:
- bolt—A log, typically 4–6″ diameter and 3–4′ long, which has been inoculated with shiitake spawn.
- forced fruiting—A process by which bolts are soaked in cold water to stimulate the growth of mushrooms for harvest.
- inoculation—The process by which shiitake spawn is “seeded” into a log to develop a bolt. This process includes drilling holes in a log, filling them with spawn, and then sealing them.
- mycelium—The vegetative body of a fungus responsible for colonization of a bolt and the foundation from which mushrooms grow.
- spawn—A sawdust medium containing fungal mycelium of a chosen strain.
- spawn run—A period of mycelial growth within a bolt after inoculation resulting in full colonization of the substrate.
- strain—A variety of shiitake with unique traits, such as appearance, growth, yield, or fruiting time.
- substrate—Material in which the mycelium of a fungus can grow (e.g., logs).
Collecting Substrate
It is imperative that the logs used for shiitake cultivation come from freshly cut trees. Shiitake is a competitive fungus, but it is still important that you give it the proper advantages to colonize the log before native fungi do. Inoculating dead wood from the forest floor is unlikely to be successful, unless you can be certain that tree was alive and healthy no more than eight weeks prior.
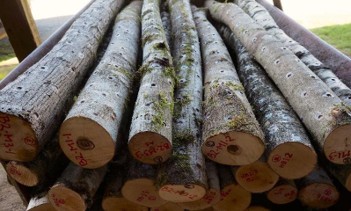
The most important decision in sourcing substrate is selecting a tree species that is well suited for the job. Shiitake is only known to grow on broadleaf trees (also called “hardwoods”). WSU Extension conducted shiitake trials and found specific broadleaf species to be better suited than others. Broadleaf species that performed well included red alder (Alnus rubra) (Figure 2), birch (Betula papyrifera and non-native birches), and Oregon white oak (Quercus garryana). Some non-native “escaped” species frequently found around farms can also be used. Common hazelnut (Corylus avellana) is favorable, and non-native sweet cherry (Prunus avium) is moderately favorable. Bigleaf maple (Acer macrophyllum), a common broadleaf species in both western Washington and Oregon, often suffers from poor or delayed spawn run and is not an ideal substrate. Additional broadleaf species are currently being trialed for performance, including Oregon ash (Fraxinus latifolia), native beaked hazelnut (Corylus cornuta), vine maple (Acer circinatum), buckthorn/cascara (Frangula purshiana) and scouler’s willow (Salix scouleriana). See the Additional Resources section at the end of this publication for information on how to stay up-to-date with the results of these trials.
Inoculation
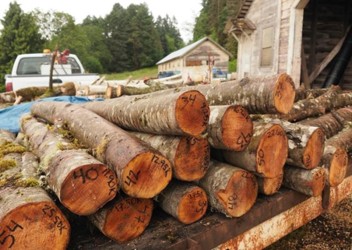
lengths (three to four feet) and ready for inoculation. Photo: Justin O’Dea, WSU
Extension.
The goal of inoculation is to jump-start growth of the shiitake mycelium inside the bolt so that it outcompetes other fungi. Inoculation is accomplished by inserting spawn into holes drilled into the sapwood of the log. This process of inoculation is straightforward but there are some important decisions to be made prior to getting started.
The first decision is what type of spawn to use. Spawn typically comes in two forms: sawdust (also called “bag spawn”) or plug spawn. Sawdust spawn tends to be more economical and is better for inoculating larger numbers of logs but requires a specialized tool for inserting spawn into the log. This tool is inexpensive and sold by spawn suppliers. Plug spawn are inoculated wooden pegs that you can insert into the log using a hammer. Plug spawn generally colonize a log slower than sawdust spawn.
Target smaller trees that are four to six inches in diameter. Logs this size are easier to transport and handle. There is no substantial advantage to bolts larger than six inches in diameter, and logs less than four inches wide dry out more quickly, potentially leading to failed or delayed colonization. Do not use any windfall trees that were blown down more than eight weeks prior to when you will inoculate, and always avoid areas on a tree where the wood is split or where the bark is damaged. Avoid harvesting any standing dead trees or trees showing signs of rot. After trees are felled, leave trees on the forest floor for three to six weeks to allow any natural antifungal defenses in the tree to dissipate that would inhibit shiitake growth. Then you can cut logs into bolt-lengths, typically three to four feet long, and move them to a covered area where you plan to complete the inoculation process (Figure 3). At all points during the timber harvest and afterward, take special care when moving logs to keep the bark as intact as possible.
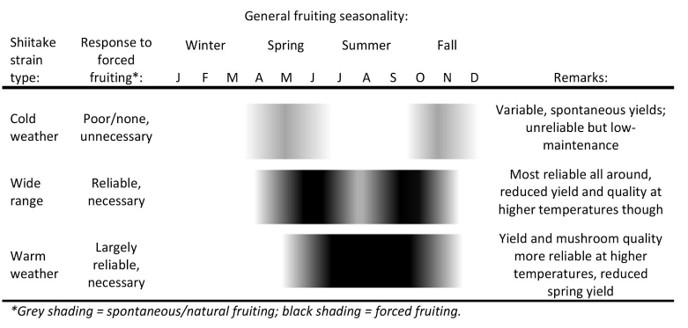
Figure 4. Generalized characteristics of shiitake strain types, including illustrations of the seasonality of spontaneous-fruiting cold weather strain types oriented towards early spring and late fall, force-fruited wide range strain types oriented towards late spring and early fall, and force-fruited warm weather strain types oriented towards summer into fall. Includes January through December fruiting seasonality timings.
Another consideration is the strain of shiitake you intend to use. Similar to varieties of plant species, strains of shiitake have diverse traits suitable for different objectives and environmental conditions. Shiitake strains have three categories: cold weather, warm weather, and wide range (Figure 4). These refer to the temperature range in which the strain will likely fruit. Cold weather strains tend to fruit in the “shoulder seasons” (late autumn and early spring). Warm weather strains fruit better during higher temperatures in mid- to late summer. Wide range strains have a broader fruiting period throughout late spring, summer, and fall but do not yield as well as warm weather strains during high temperatures. Often wide range strains also have the shortest spawn run periods.
Wide range and warm weather strains respond well to forced fruiting through immersion in water (discussed in the Fruiting and Harvest sections), but cold weather strains rely on natural changes in weather patterns to initiate fruiting. Cold weather strains can be an option for a passive shiitake grower who does not want to deal with soaking and is not counting on reliable harvests, but there are some important drawbacks to consider. Because cold-weather strain bolts are not periodically soaked for forced fruiting, they more readily lose moisture during the dry summer season in the PNW. This may delay their spawn run by a year or more or totally compromise colonization if the moisture content of the bolt falls too low for too long.
Another downside to cold weather strains is that they often fruit during reliably rainy times of the year in the PNW, and the rain diminishes the quality of mushrooms. Since they are not force fruited, the bolts will also produce less each year compared to warm and wide range strains.
Once you have selected your spawn type and strain, you can begin inoculation. Do this in a covered area that has access to electricity. It can help to have a sawbuck to hold the log while drilling (Figure 5) and a table with a pallet set on top to hold the log in the gap between the boards for plugging and waxing (Figure 6).
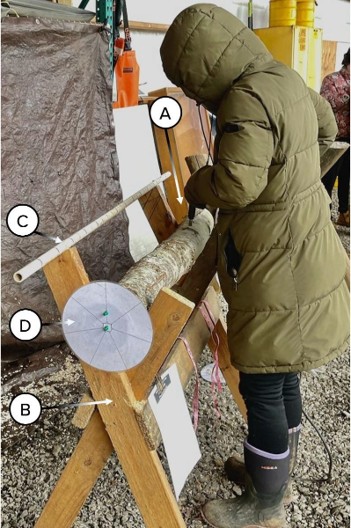
Figure 5. During the drilling step (A), a simple sawbuck (B) is useful for holding a log in place. This one was made out of the lumber from a shipping pallet and has a drilling guide made from a PVC pipe screwed onto the top (C). Marks on the guide are two alternating colors; the space between marks of the same color are four inches apart for gauging the distance between holes drilled into the log. In the picture, a guide was pinned onto the end of the log (D) to show where the rows should be placed, in accordance with the diameter of the log. Photo: Justin O’Dea, WSU Extension.
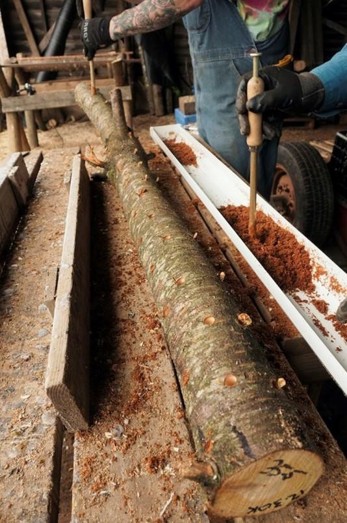
Figure 6. Shiitake sawdust spawn being inserted into holes drilled into the sapwood of a log using a simple inoculation tool while laying the log in the gap of a wooden pallet to hold it in place. Photo: Justin O’Dea, WSU Extension.
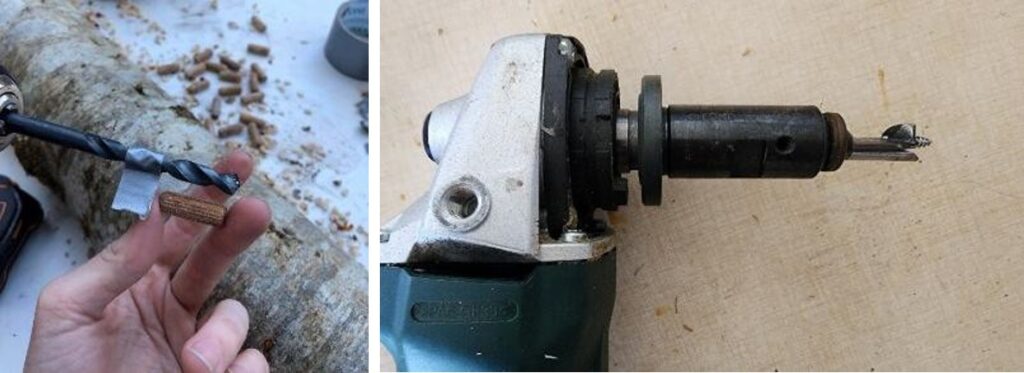
Drilling can be done with a handheld drill with a 5/16th-inch (sometimes sold as 8 mm) drill bit for plug spawn, or a 1/2-inch (sometimes sold as 12.5 mm) bit for sawdust spawn. Holes should be drilled one inch deep. Putting a piece of tape on the drill bit to mark one inch can be helpful to achieve consistent drilling depth (Figure 7). Alternatively, some equipment and spawn dealers sell modified bits with a built-in stop collar which can be attached to either a hand drill or an angle grinder, the latter of which drills holes much faster (Figure 7). These can greatly improve speed and efficiency of inoculation for large numbers of logs.
Safety glasses should be worn when drilling, especially when using an angle grinder, to protect your eyes from flying chips. The general drilling pattern is holes four inches apart within rows, with rows spaced two to three inches apart. Every other row is offset such that holes align with the center of the gap between the holes in the row above, creating a diamond pattern for better coverage (Figure 8).
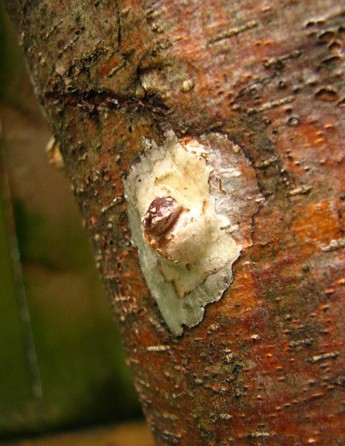
Once the holes are drilled, fill them with spawn. For plug spawn, use a hammer or rubber mallet to insert the plug into the hole, taking care to get it as flush with the surface of the log as possible without damaging the bark (Figure 9). For sawdust spawn, use an inoculation tool (Figure 10). This tool has a chamber at the bottom the same size as the 1/2-inch holes drilled into the log. This chamber is filled by pushing it into the sawdust spawn that has been broken up and spread in a tray, bucket, or other container. Depress the plunger at the top of the tool to push in the spawn. The hole should be filled to just below the bark. This will allow the wax seal to be flush with the bark. Protruding wax seals can be scraped off while handling the bolt, which decreases moisture retention (Figure 11).
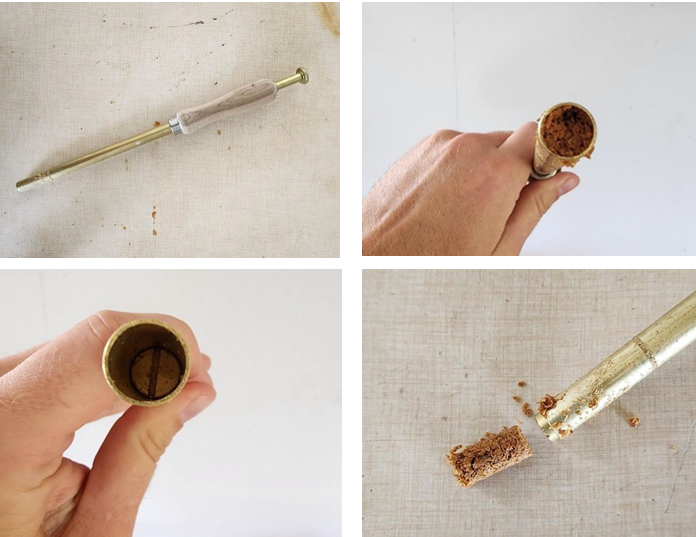
Figure 10. The inoculation tool used for sawdust spawn is a simple plunger (top left) with a chamber that is ½-inch diameter and one inch length to match the size of the inoculation hole (bottom left). The tool is inserted into spawn to fill the chamber (top right) and then the plunger is depressed to insert the sawdust spawn into the hole (bottom right). Photos: Patrick Shults, WSU Extension.
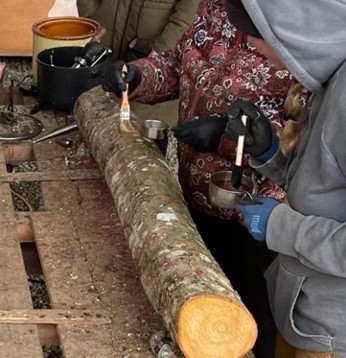
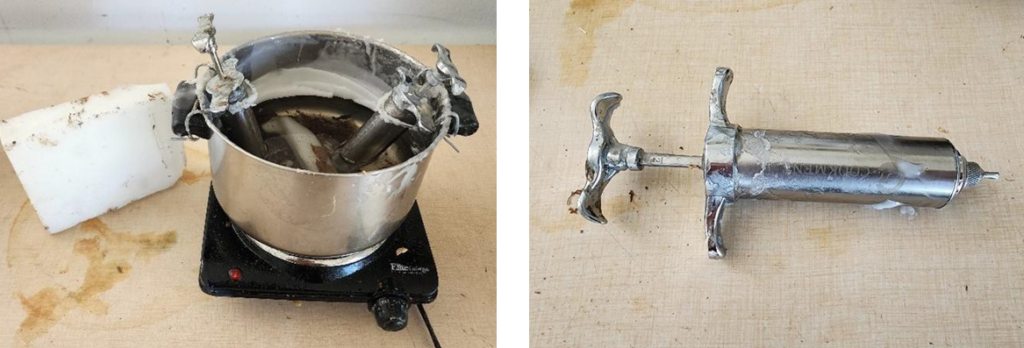
Once all the holes are filled with plugs or sawdust spawn, seal the holes with wax (Figure 12). A food-grade wax such as cheese or soy wax is more ideal to be used because mushrooms often emerge from the wax-filled inoculation holes and will likely come in contact with it. Cheese wax heated to 200°F works particularly well. Wax that is too cool becomes gummy and will not stick to the bolt as well. If the wax is heated above ~250°F, it will begin to burn and smoke. Note that wax will not stick to wet logs. An electric pot/pan or hot plate with an adjustment knob for specific temperatures (rather than just low/medium/high) works very well for melting wax and can often be found affordably at thrift stores. If you heat your wax with something that only has crude/analog adjustments, any culinary type of thermometer (meat, candy, etc.) can be used to help try and determine your wax temperature at a given setting. Take measures to make sure the hot wax cannot be spilled on anyone, such as securing the electric pan to the table. Wax is flammable, so heating wax in a pot over an open flame is a safety risk. Wear gloves to protect hands from hot wax and safety glasses to protect eyes from splatter. Wax can be applied with several different tools. A small paint brush with natural fibers can be used. Foam brushes are also economical and work well if the foam is secured to the handle, as the glue tends to fail otherwise when heated. Avoid brushes with synthetic fibers, which may melt when heated. A silicone basting brush also works well: since it can withstand high temperatures, the heated wax easily flows from the brush to the log, and the brush is easy to keep clean because cooled wax will not stick to the bristles. A metal meat injector syringe with a needle tip cut to the base (Figure 13) also works well and holds enough wax to do one or more rows at a time.
When applying wax, aim to get complete coverage of each hole to avoid letting the spawn dry out. Ideally, drilled logs should be inoculated and waxed in consecutive sequence. Complete the full drilling, inoculating, and waxing process one log at a time to avoid the interior of the holes or spawn drying out; avoid separating these steps by time spans of several hours or more. Gently place your new shiitake bolts in a covered area until you can move them to the forest for the spawn run period.
Spawn Run
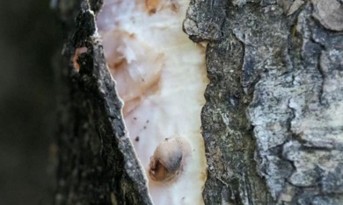
The spawn run is a period following inoculation in which the fungus fully colonizes the wood of the bolt. During spawn run, a “mycelial mat” of shiitake fungus also develops just under the bark of the bolt which mushrooms will eventually develop from (Figure 14). This is another reason why the bark integrity of the bolt is important. For wide and warm range strains, the spawn run typically takes a full year or more in the PNW, from the spring of the inoculation year to the following spring or summer when the bolts are ready for forced fruiting. Cold weather and some warm weather strains may take longer. Spawn run in denser woods such as oak will commonly take 18 to 24 months. Often signs of a healthy spawn run can include white mycelium being visible on the end of the bolt, showing that the fungus is successfully growing lengthwise through the sapwood (Figure 15). Other signs may include wax plugs being pushed out of the inoculation holes by the mycelium, and incidental spontaneous fruiting of shiitake mushrooms in winter or spring of the spawn run year.
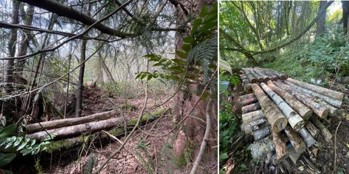
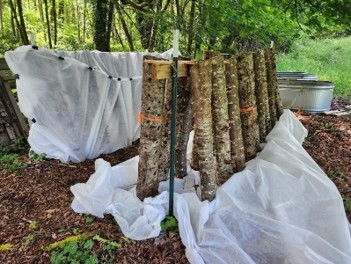
Figure 16. Smaller numbers of bolts can simply be placed in a well-shaded forest location, near to the ground but out of direct contact with the forest floor (left photo); “crib stacks” are typically how more than approximately six to eight shiitake bolts are stored in the forest during the spawn run period when the
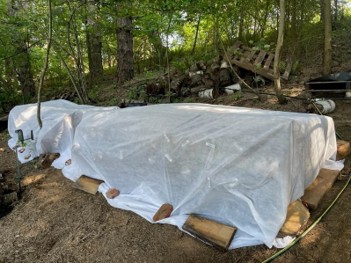
Figure 17. Covering crib stacks with a breathable layer of fabric, such as Reemay, can help mitigate moisture loss during the dry season but should be removed in the fall to avoid inhibiting rains from providing a natural moisture recharge over the winter. Photo: Justin O’Dea, WSU Extension.
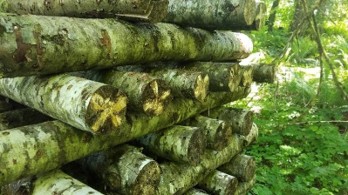
During the spawn run and in between harvests, bolts are usually kept in crib stacks (Figure 16). You can use this method if you have more than six to eight bolts; a crib stack will often accommodate 24 or more bolts in four layers that are stacked on top of one another in an alternating, perpendicular fashion. This mitigates exposure for most of the bolts and minimizes the space used. Use something to elevate crib stacks from the ground (such as a shipping pallet, cinderblocks, or other logs). Direct contact with the soil increases the risk of contamination from pest fungi and dampwood termites (Zootermopsis angusticollis).
Bolt moisture management is perhaps most critical during the spawn run and this is particularly challenging during the dry summers of the PNW. This has led to many failed attempts (or perceived failure) by hobbyist shiitake growers in the region. If the proper conditions are not provided, excessive drying can lead to failed or delayed colonization. Delayed colonization of the bolt has been observed to last up to three years in the PNW if bolt moisture is not managed well, especially if drying conditions are pronounced during the spawn run. Other fungi that tolerate dry conditions may also eventually outcompete shiitake if spawn run is highly delayed. Therefore, selecting the proper place to keep your bolts, called the laying yard, is important. Choose an area that has full shade, is protected from wind, and, if possible, is able to maintain a higher relative humidity (e.g., next to a creek or near a low, wet area). Beneficial attributes of a laying yard site include north-facing slopes with tall evergreen trees on the south side. Choosing sites with these characteristics will help mitigate moisture loss in the bolt, which will support vigorous shiitake growth.
An additional strategy for ensuring there is sufficient moisture in the bolt to sustain shiitake growth through the dry months of the spawn run is to immerse the bolts in water for 24 hours in late June or early July, prior to the start of the dry summer season. Having access to water at the site will help you accomplish this, and is also beneficial for forced fruiting after the spawn run (see the Harvest section), although if you only have a few bolts you can move them to a water source. Soaking your bolts will be much more targeted than using overhead sprinklers to “irrigate” your bolts, as the latter only temporarily wets the log surface—unless long, intensive irrigation is used. Repeated surface wetting during warm weather can also lead to hastened bark deterioration.
Providing bolts with an influx of wood-penetrating moisture from soaking at this time is advantageous, as mycelium growth is most vigorous at the temperatures summer provides, as long as moisture is adequate. The optimal conditions are approximately 40% bolt moisture content with an ambient temperature of 70°F–80°F). Note that soaking the bolts at this stage just recharges them with moisture, as it is early enough in the spawn run period that it will not incite fruiting. You can also cover your bolts while they are in the crib stack during the summer using a breathable, polyester fabric called a “frost blanket” or a “floating row cover” (also referred to under the trade name “Reemay”) (Figure 17) or a bedsheet to help mitigate moisture loss. If you do this, it is important to remove this cover in the late fall and winter to allow for better moisture recharge from rainfall. Another option is to cover your bolts with leaf litter over the summer. A layer of branches can also provide some added shade and wind protection to the bolts if needed.
Fruiting
If all goes well, the bolts should be ready for fruiting after a year of spawn run. Cold weather strains fruit naturally during the shoulder season transitions (early spring and late fall), so you simply need to check on them for signs of fruiting during these times. Keep in mind that the spawn run for cold weather strains may take longer than one year. For wide range or warm weather strains, you will need to force fruit bolts by submerging them in cold water. In this process, the difference in temperature between the air and water “shocks” the vegetative fungal body into fruiting. Ideally, the water should be about 12°F–20°F lower than the air temperature to effectively incite fruiting. Therefore, it is best to do this when daytime temperatures are warm enough that a sufficient temperature change can be achieved in the bolt, which is typically between mid- to late May and mid-September in the PNW. Groundwater is usually sufficiently cold for this, although if your water lines are exposed to the sun, you may choose to clear the warm water from the line before filling whatever receptacle you plan to soak them in.
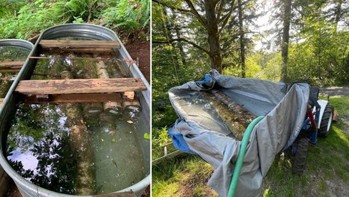
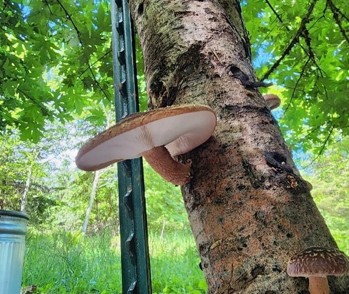
There are a number of creative ways to soak bolts when dealing with just a few, including bathtubs, tarps, or even in nearby creeks. When dealing with larger numbers of bolts, galvanized metal livestock tanks tend to be easiest and most reliable (Figure 18). Regardless of what you use to soak the bolts, the most important components are water temperature (cold/cool) and immersion time (bolts fully immersed for approximately 24 hours). The bolts will be buoyant and some may sit on top of others without reaching the water, so they will need to be held down below the water level. Boards can be wedged under the lip of the stock tank to accomplish this. Once the bolts are pulled from the water, they are typically set upright for the next several days while they undergo the fruiting process; they are most often put in an “A-frame formation” with bolts leaning on either side of a central support structure (Figure 19). This allows the mushrooms to grow more freely and provides easier access to picking the mushrooms once they are formed. Within a few days of soaking, you should see small “pins” (primordia) forming and cracking through the surface of the bolts or out of the inoculation holes (Figure 20). Depending on the air temperatures during fruiting and the strain chosen, within 6–14 days you should have fully formed mushrooms ready for harvest. Colder temperatures will slow mushroom growth and delay harvest, and warm weather strains tend to grow slower than wide range strains. If there is rain that is predicted during fruiting, use some means to protect your growing mushrooms from getting wet, as this will reduce the quality and storability of the harvested mushrooms. This could include loosely draping a tarp over them (then removing once the rain stops) or building a small canopy over the A-frame.
Protecting the mushrooms from pests is important to ensure their quality. Isopods (known as sowbugs, pill bugs, potato bugs, or woodlice) and slugs are the most common pests observed in the PNW. Slugs can be deterred using over-the-counter slug deterrent or copper mesh placed around the bottom of the bolts. Other small forest insects can infest the gills without doing notable damage to the mushroom but may be unappetizing. An effective way to exclude all pests is to create a “fruiting tent” by completely wrapping your bolts in a breathable fabric (usually the same material used to cover the logs during the summer of the spawn run year). The tent should have no gaps, holes, or splits to effectively exclude pests (Figure 19). This will have added benefits of reducing the risk of mushrooms desiccating if there is hot, dry, or windy weather during fruiting and will also protect them from rain. For smaller numbers of bolts, you could choose to bring them into a sheltered or indoor area after soaking, such as a garage, basement, or shaded porch.
Harvest
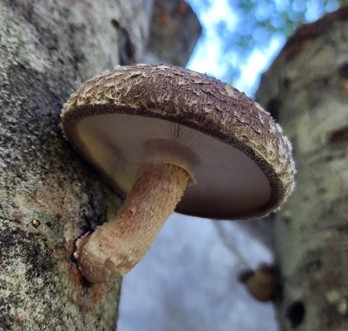
Shiitake are best harvested when the cap is slightly curled underneath (Figure 21). The quality is reduced once the caps have flattened out or turned upward, but they are still edible. The mushrooms can be plucked directly off the bolt, but this sometimes removes bark in the process. Alternatively, you can elect to cut them off with kitchen scissors or pruning shears, which will reduce bark damage. Collect your mushrooms in a paper bag or other breathable material and store in the fridge immediately. If stored properly they will stay fresh for several weeks. Overripe shiitakes and higher moisture content shiitakes will bruise and oxidize more readily in storage, but shiitakes rarely rot in the refrigerator, unless they are packed too tightly, are packed wet, or are stored in nonbreathing containers (e.g., plastic). For longer-term storage, consider drying the mushrooms in a dehydrator or freezing them. Rehydration of dried shiitake can take as little as 20 minutes if soaked in hot water, or they can also be soaked overnight in room-temperature water.
The cap of the shiitake mushroom is the edible portion, as the stem is woody. The stems are good for flavoring broth or stock, though. Shiitakes should never be eaten raw. Some people can develop an itchy skin reaction called shiitake flagellate dermatitis from consuming raw or undercooked shiitake (Ade et al. 2014). Water-soaked shiitake mushrooms are difficult to cook properly. Generally, avoid washing your shiitakes, but if needed, do so only briefly as they will readily absorb too much water, making it more difficult to cook properly.
After you have finished harvesting your bolts, place them back in the crib stack to “rest” for seven to eight weeks before trying to force fruit them again. Some shiitake growers inoculate enough bolts to soak one or more bolts every week, so that they have mushrooms throughout the season (roughly May to September). Yields from each forced fruiting will commonly vary. A given bolt may produce nothing for a few forced fruitings and then produce several harvests all at once, or they may produce more steadily. A conservative average estimate of 0.25 pounds per bolt per forced fruiting may be expected. Bolts can continue to produce mushrooms for several years if managed appropriately. Fortunately, for warm and wide range strains, the process of soaking the bolts to force fruit them has the added benefit of recharging them with moisture. Shiitake bolt yields are typically strongest early on but then gradually decline with age, usually within three to five years. To counter this decline and ensure ongoing harvests year after year, you can add newly inoculated bolts each year or two in anticipation of bolts starting to age out. Bolts that have aged out can be discarded into the forest or composted. Aging bolts are not expected to have any negative impacts on the environment; although shiitake is very competitive once established as the dominant species in a piece of wood, shiitake has not been observed to occur naturally in the PNW environment as a feral species.
Some Core Supplies and Equipment Used for PNW Shiitake Cultivation
- Chainsaw, loppers
- Freshly cut logs from broadleaf species like oak, alder, or birch
- Sawbuck
- Pallet
- Handheld drill or corded angle grinder with modified bit and adapter
- Sawdust spawn
- Cheese wax
- Electric pan or pot that can be set specifically to 200°F
- Silicone basting brush or meat injector (for wax)
- Gloves and safety glasses
- Stock tank
- Agricultural fabric
- Lumber and T-posts for A-frame structure
Additional Resources
- Pacific Northwest Forest-Cultivated Mushroom Growers Network website. Use this resource to stay informed of WSU Extension shiitake trials and related work.
- Best Management Practices for Log-Based Shiitake Cultivation in the Northeastern United States—Cornell Small Farms Program. This guide is specific to the northeastern United States but may offer helpful information for PNW growers supplemental to this publication.
- Cultivation of Shiitake, the Japanese Forest Mushroom, on Logs: A Potential Industry for the United States (pdf)—Gary Leatham
- Shiitake Growers Handbook: The Art and Science of Mushroom Cultivation—Paul Przybylowicz and John Donoghue
References
- Ade, R., C. Sukut, H.J. Wiser, S. Shockman, and L. Buescher. 2014. Shiitake Dermatitis Demonstrating Köebner Phenomenon. International Journal of Dermatology 54(5)L: 499–613.
- Chang, S.-T., and P.G. Miles. 2004. Mushrooms: Cultivation, Nutritional Value, Medicinal Effect, and Environmental Impact, second ed. CRC Press.
By
Patrick Shults, Extension Forester, Washington State University Extension
Justin O’Dea, Regional Agriculture Specialist, Washington State University Extension
Kevin W. Zobrist, Professor, Washington State University Extension
Eric Jones, Oregon Shiitake Trial Lead, Oregon State University
Copyright © Washington State University
WSU Extension publications contain material written and produced for public distribution. Alternate formats of our educational materials are available upon request for persons with disabilities. Please contact Washington State University Extension for more information.
Issued by Washington State University Extension and the US Department of Agriculture in furtherance of the Acts of May 8 and June 30, 1914. Extension programs and policies are consistent with federal and state laws and regulations on nondiscrimination regarding race, sex, religion, age, color, creed, and national or ethnic origin; physical, mental, or sensory disability; marital status or sexual orientation; and status as a Vietnam-era or disabled veteran. Evidence of noncompliance may be reported through your local WSU Extension office. Trade names have been used to simplify information; no endorsement is intended. Published February 2025.