Planting Trees and Shrubs in the Landscape (Home Garden Series)
Description
Trees and shrubs form the backbone of any well-designed landscape. Unfortunately, problems associated with root systems often doom the trees and shrubs in our landscapes to failure.
Table of Contents
- Common Planting Problem—Planting Too Deep
- Digging the Hole and Planting
- Common Planting Problem—B&B Plants
- Planting a B&B Plant
- Common Planting Problem—Dense Root Masses on Container-Grown Plants
- Releasing and/or Removing the Roots
- Testing Drastic Measures—Bare Rooting Before Planting
- Staking After Planting
- Fertilizing Newly Planted Trees and Shrubs
- Watering Newly Planted Trees and Shrubs
- References
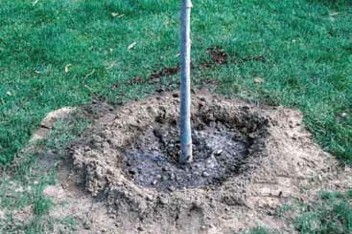
Trees and shrubs form the backbone of any well-designed landscape. We plant them with the hope that they will “live long and prosper.” Unfortunately, problems associated with root systems often doom the trees and shrubs in our landscapes to failure; 80% of landscape tree problems are thought to start below ground (Watson 1994).
Trees and shrubs are grown and readied for planting by three different methods: bare-root, balled-and-burlapped, and containers. Bare-root plants have been dug from the nursery field without attached soil and are typically deciduous shade trees, fruit trees, and some flowering shrubs. Balled-and-burlapped plants are dug from the nursery field with a ball of soil around the roots. The soil is wrapped with burlap that is typically held on the ball with twine. Container-grown plants come in a variety of sizes but usually are grown in soilless, mostly organic potting mixes. Field-potted plants are dug bare-root and then potted in either plastic or paper maché pots.
The type of plant you purchase will dictate specialized planting practices and potential problems, but there are some practices and problems common to all tree and shrub plantings.
Common Planting Problem—Planting Too Deep
For many years, planting holes were dug deep and fairly narrow to accommodate root balls. This was because of the misconception that most trees and shrubs developed deep tap roots. In reality, the root systems of trees and shrubs planted in home landscapes, parks, and along city streets are wide and fairly shallow. This is because roots only grow as deep as soil conditions permit, with lack of air in the soil being a primary limiting factor to root growth in typically compacted home and urban landscape soils. Research has shown that planting holes should be wide, but only deep enough to accommodate the root ball (Watson and Himelick 1997). The root ball of bare-root plants should be set on firm soil. When plants are placed in deep holes, they have a tendency to settle after planting and watering. As a result, they end up planted too deeply when the soil settles.
Digging the Hole and Planting
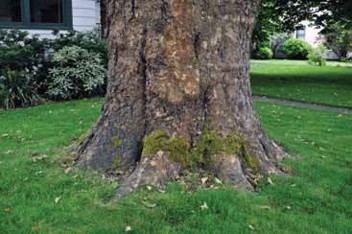
Plant your tree or shrub in a saucer-shaped planting hole dug no deeper than the root mass, but deep enough so that the bottom of the root mass rests on the bottom of the hole when the top of the root collar is at or slightly (not more than 1 to 2 inches) above the soil line (grade). The top of the root collar is where the first root originates from the trunk of a tree. On most mature trees and some young trees, the trunk flares outwards at the root collar (Figure 1).
The planting hole diameter should be 2 to 3 times the width of the root ball at the surface and the sides should slope toward the bottom of the root ball. Carefully spread the roots while backfilling with the existing native soil, minus any large rocks or debris. The soil should not be amended with any type of organic matter. Be sure to keep the roots spread as the hole is backfilled (Figure 2).
In sites with poorly drained soil, the plant should be planted higher or even set on top of the ground and filled in around the root ball, creating a planting berm (Figure 3). Next, thoroughly water the plant to settle the soil. Stick a hose into the soil of the planting hole and let the water run. This watering helps eliminate air pockets around the roots. Once the water starts overflowing the hole, stop and let the water drain in order to see if you need to add more soil. Gently firm the soil around the roots with your hands. Do not compact the soil by stomping on the roots and soil, as this will decrease both the drainage and aeration and can damage the roots.
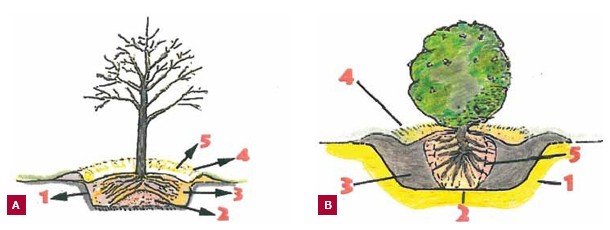
Instructions for Figure 2:
- Dig the hole large enough to accommodate the root system or root ball (A1). When possible, dig a hole 2 to 3 times the width of the root system (B1). The sides of the hole should slope toward the bottom of the root ball.
- Place the tree or shrub in the planting hole so it is slightly higher than the level it was growing in the nursery. For bare-root trees, a cone of soil in the center of the planting hole should help achieve this (A2).
- Backfill using only native soil. Do not add any type of organic matter.
- create a basin to retain water by constructing a small berm around the planting hole. Water immediately after planting.
- Use a mulch to conserve soil moisture. If the soil around the root system of balled and burlapped plants differs greatly from the native soil, gently fork some of the soil off the root ball and expose the roots (B5, dashed line).
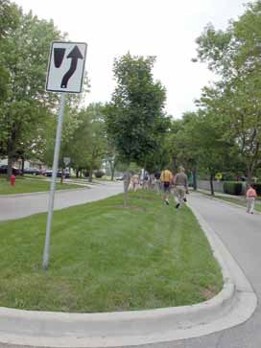
Create a basin to retain water by constructing a small berm (2–4 inches tall) around the periphery of the planting hole so that water drains away from the trunk of the tree but does not run off the root system (Figures 2 and 4). Finally, mulch the entire planting area with a 2 to 3-inch layer of aged wood chips or shredded bark. Keep the mulch at least 4 to 6 inches away from the trunk of the tree.
Common Planting Problem—B&B Plants
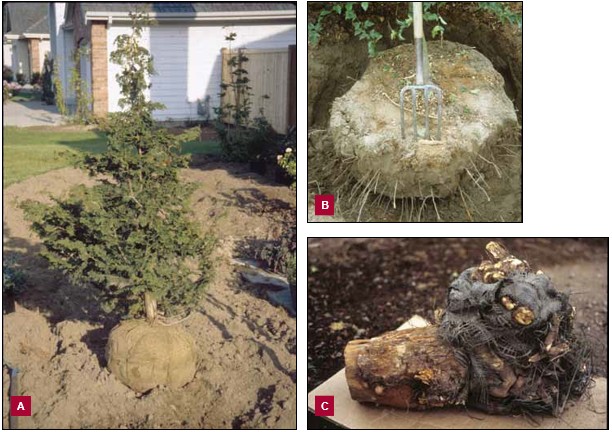
One common problem encountered when planting trees or shrubs occurs with “B&B” or balled-and-burlapped plants. A commonly recommended planting practice in the past was loosening the twine and leaving the burlap around the root. It was believed that the burlap and jute twine would rot quickly and not impede root growth (Figure 5).
Today, plastic twine is often used to tie up the root ball and most of the burlap that’s used to encase plant root balls is treated with copper to keep it from rotting in the nursery or garden center. The copper treatment gives the burlap a green tint. Unfortunately, the copper also slows the rot of the burlap in the ground and usually hinders root growth. Even when not treated with copper, buried burlap and jute twine don’t rot as quickly as once thought, especially in arid regions.
Planting a B&B Plant
To plant a B&B tree or shrub correctly, place the plant in the planting hole and then cut off and remove all the twine and the burlap from the top and around the sides of the ball. Some experts may still recommend folding back the burlap and leaving it in the bottom of the hole, but this could interfere with root growth and water distribution. Others recommend slashing or cutting up the burlap, but not removing it. This can also interfere with water movement and the treated burlap can hinder root growth.
Without removing burlap, you have no way of examining the base of the trunk and root ball for defects. You also can’t determine the location of the root collar. When nurseries dig and prepare B&B plants for sale, soil can become mounded around the trunk and the top of the root ball ends up being far above the root collar. If soil is mounded up around the trunk of a plant and you don’t remove the burlap, you can’t probe the root ball to determine the location of the root collar, and a plant can end up planted too deeply.
Common Planting Problem—Dense Root Masses on Container-Grown Plants
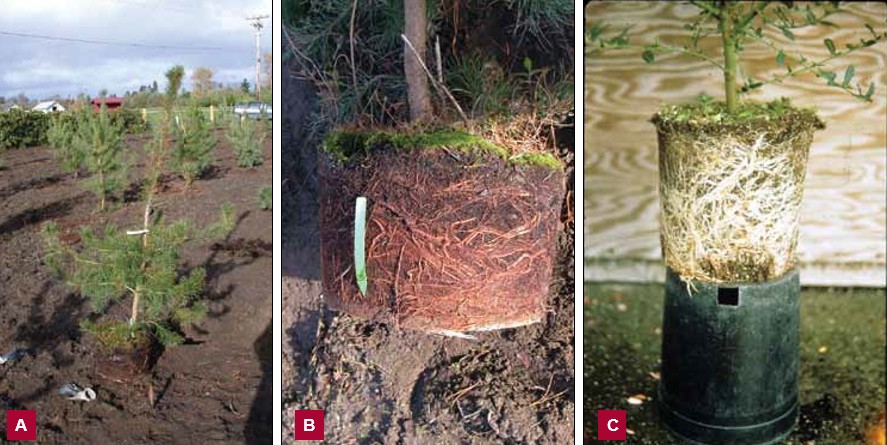
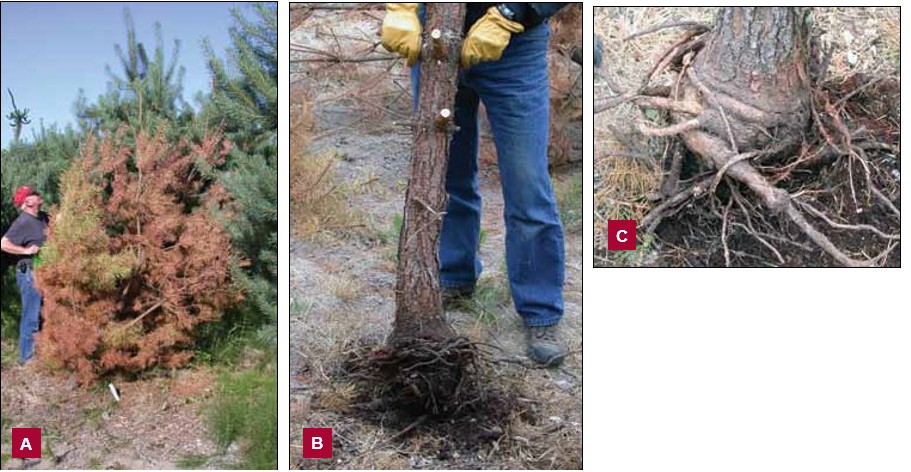
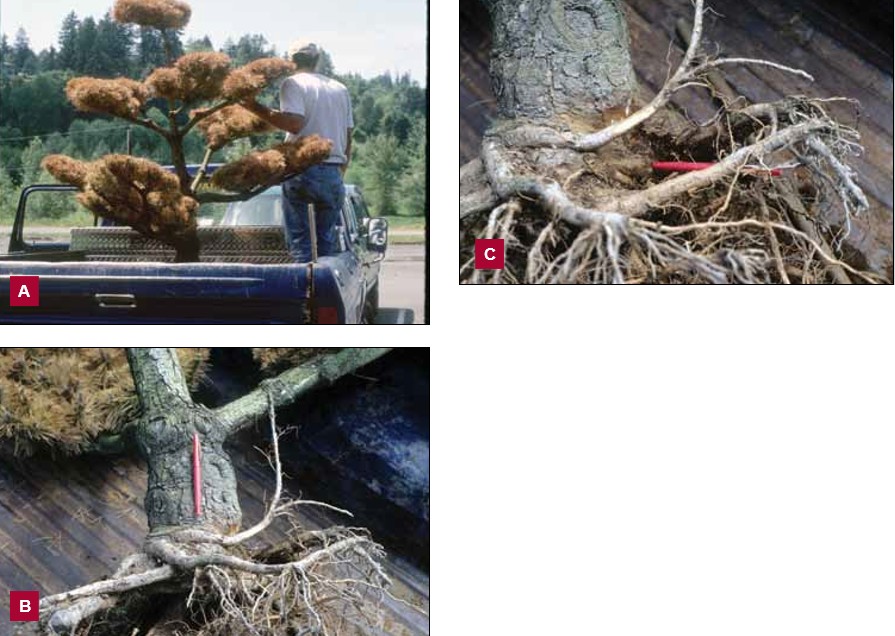
Certain types of trees and shrubs often develop dense masses of fibrous roots that grow around and circle the edge of the root ball at the interface with the container, especially if the plants have been left in the containers too long (Figure 6). This is called “pot-bound” or “root-bound.” If planted in the ground without disrupting the tightly packed combined mass of potting medium and roots, the roots of root-bound plants may fail to grow out into the surrounding soil. This limits the plant’s access to available water and soil nutrients in the surrounding soil, leading to plant stress and ultimately failure of the plant (Figure 7).
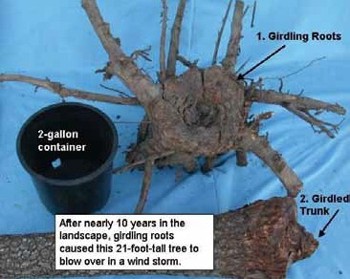
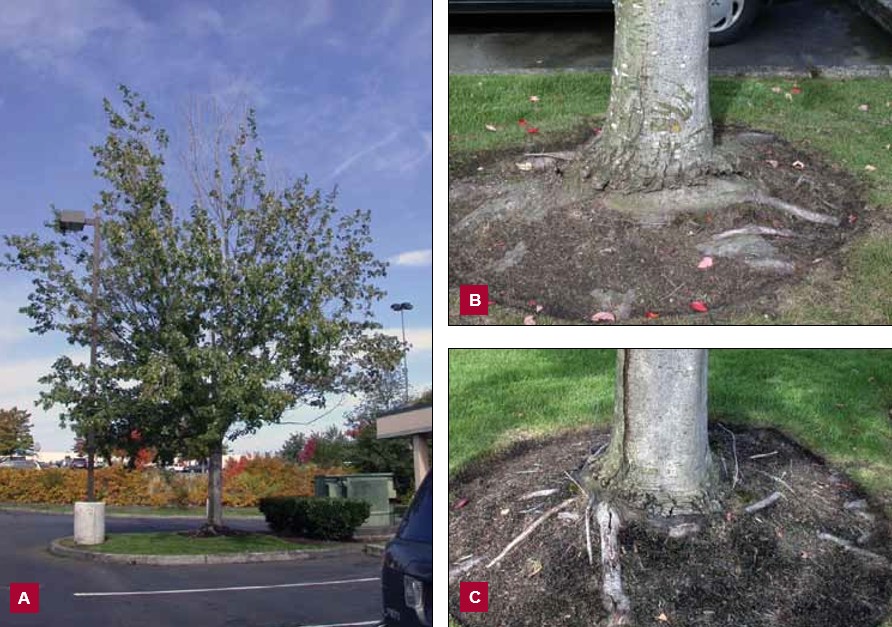
Other types of trees and shrubs have coarser woody roots that encircle the periphery of the root ball when they reach the interface with the pot. If not straightened at planting time, these can become girdling roots (Figure 8). Girdling roots start out as roots that grow around the trunk and/or other roots. Over time these circling roots grow in diameter and can girdle or strangle the plant. Girdling roots inhibit normal water and nutrient flow, thereby stressing the plant and leading to its decline. Similarly, kinked roots are sharply bent one or more times, restricting the movement of water and nutrients and preventing the development of a well-structured root system. Trees stressed by girdling and kinked roots are more susceptible to disease and insect attack. Girdling roots compromise the tree’s structural integrity, making it more susceptible to blow-down by the wind (Figure 9). The presence of girdling and kinked roots often goes undetected because they remain unseen while the affected tree or shrub slowly declines.
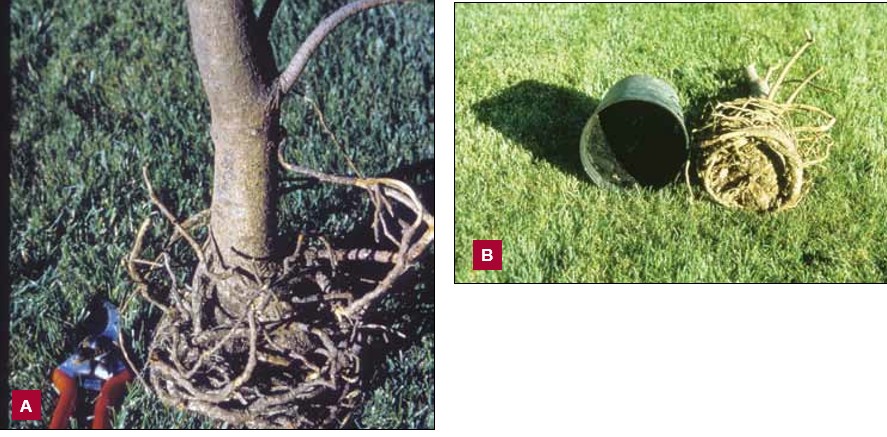
Proper treatment and spreading of root systems at every transplanting, including repotting, is essential for long-term success of trees and shrubs. If circling roots are not eliminated at planting, the life expectancy of the tree in the landscape is typically 10 years or less. If the circling roots of the trees in Figures 7–10 had been cut and spread at transplanting time, they would be alive and healthy today and the maple tree in Figure 11 would not be dying.
Releasing and/or Removing the Roots
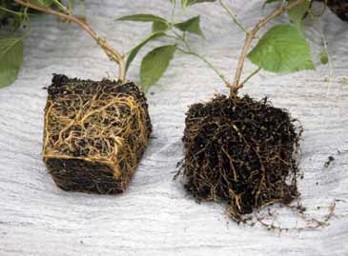
Root girdling can be prevented by straightening or removing circling roots while they are still small and flexible (Figure 12). This requires vigilance and attention to detail on the part of all persons involved with the production and planting of trees and shrubs. Nursery growers, landscapers, and home gardeners must visually inspect the root system, cut or spread circling roots, and cut off kinked roots each time the tree or shrub is transplanted to a larger container or into the landscape (Figure 13).
When you remove a tree or shrub from a container, you need to encourage the roots to leave the molded and possibly root-bound mass. If not extremely dense, you can use your fingertips to gently loosen the potting medium, teasing and straightening the roots out of the mass. The longer roots may be cut off. Watering the plant thoroughly before removing it from the pot will make this process easier.
If the root mass is too dense for teasing with your fingers, use a sharp knife to make 4 to 8 shallow vertical slices from the top of the root mass to the bottom, cutting through any woody circling roots (Figure 13). Then loosen the cut roots and spread them away from the container.
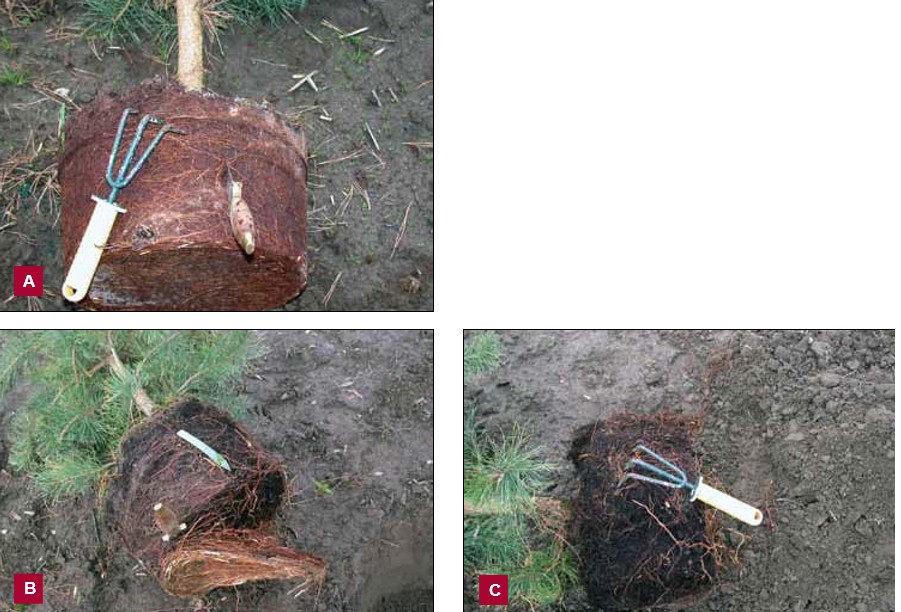
If the roots are so tightly knitted together that they can’t be loosened with your fingers, it’s still important to spread the roots to prevent girdling and to encourage root growth out of the root ball (Figure 14). Recent university research indicates that slicing alone usually doesn’t prevent root girdling. Experts at the University of Florida now recommend shaving off the entire outer ½ to 1 inch of the sides and bottom of root-bound masses (Gilman et al. 2009). The experts indicate that roots should be cut at the point just before they dive deeper into the soil near the sides of the container. Because this is a severe method of solving the problem of extremely root-bound plants, it should only be performed when planting in early spring, long before hot weather is imminent.
Testing Drastic Measures—Bare Rooting Before Planting
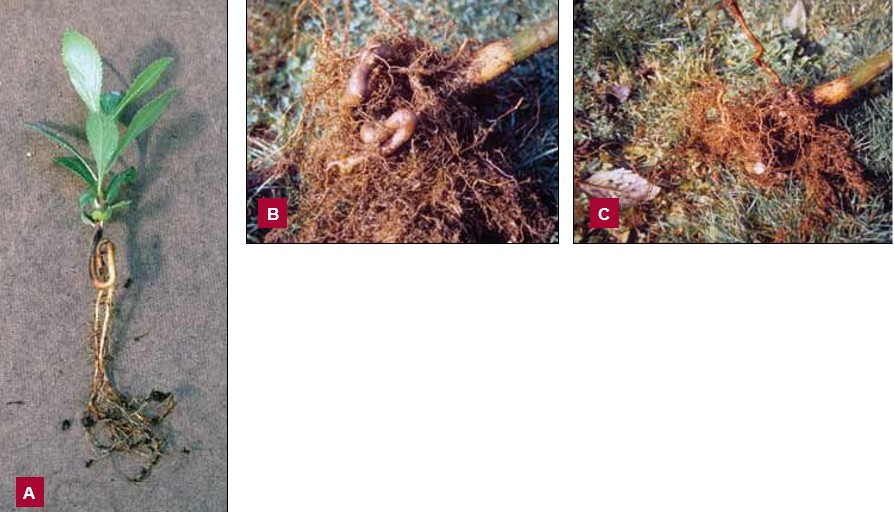
Because of the increasing frequency of root defects and planting problems that we’ve discussed, some arborists and horticulturists are exploring more drastic rootball disruption procedures when planting trees and shrubs. They propose removing all the soil or potting mixture from the roots of both container-grown and balled-and-burlapped plants. This is done using a water bath and hose to gently, carefully “wash” the roots.
After washing all the soil off the roots, the trees and shrubs are then planted as if they were bare-root plants. It’s important to emphasize that this method of planting is drastic, aggressive, and still being tested. The research to date is limited, but studies have shown tree species differ in their tolerance to root system disruption. When survival of bare-rooted and intact-root Scotch and shore pines was compared, all Scotch pine were living 3 years after trans-plant but only half the bare-rooted shore pines survived (Hummel at al. 2009). Researchers in Virginia bare-rooted red maple and willow oak trees at transplant and found no difference in survival of the red maples when compared to intact rootball trees, but half of the bare-rooted willow oak trees died (Appleton and Flott 2009). In greenhouse experiments, Chalker-Scott and Stout (2009) found bare-rooting had no deleterious effects on two shrub species, Pacific wax myrtle and arborvitae.
The bare rooting process allows you to note and attempt to correct any girdling and kinked roots that weren’t visible with the soil covering the roots, although some root problems may be too severe to rectify. By bare rooting, you may also avoid problems that occur because of extreme differences in texture between the rootball and the backfill soils, such as when transplanting B&B plants with heavy clay rootballs into sandy soils. In addition, it’s easy to tell where the root collar is located, which facilitates planting at the correct depth. This technique has the best chance of success if done properly, when the plants are young and still dormant, during the cool weather of early spring, and when plants are given the proper follow-up care. The roots must be kept cool and moist during the process. It’s critical not to allow the roots to dry out during the washing and planting process.
While this method of tree planting is experimental, controversial, and usually nullifies any warrantees given to buyers, it could be a way to prevent the eventual failure of a tree or shrub due to structural defects in the root system. More research is needed to understand how species differences, time of year, plant growth stage, nursery production method, and bare-rooting technique influence survival and growth.
Staking After Planting
In most home landscape situations, you don’t need to stake a newly planted tree. Research over the years has proven that trees do better if they’re not staked. Trees establish more quickly, developing more roots and thicker, stronger trunks without staking (Harris et al. 2004).
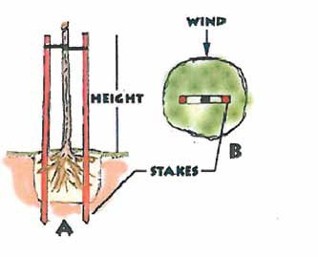
However, in extremely windy situations a tree may need to be staked. Trees may also require staking in certain public situations in order to protect them from vandalism or mower injury. Staking is best accomplished using two stakes secured to the tree using 3-inch-wide horizontal straps of webbing or flexible rubberized chain (Figure 15). Never secure a tree to a stake using a hard material, such as wire (even if cushioned by a section of garden hose) or hard plastic chain. These can damage the tender bark on the trunk. The straps should be secured on the lower half of the trunk to allow for as much trunk movement as possible. Remove stakes as soon as possible; in general, staking should not be left on for more than one year.
Fertilizing Newly Planted Trees and Shrubs
At present there is no general consensus among experts regarding fertilizing newly planted trees and shrubs (Struve 2002). Recent studies show mixed results or no clear benefit from fertilizing trees at transplant (Day and Harris 2007). Although recommendations vary, there is general agreement that in nutrient-deficient soils, fertilizing at transplant should be beneficial. A soil test will determine if your soil is deficient in nutrients. To find out where you can get your soil tested, contact your county Extension office.
In most situations, nitrogen is the limiting nutrient. Fertilizer should not be added to the backfill soil, but slow-release fertilizers can be applied to the soil surface at planting following the manufacturer’s instructions. Avoid using fertilizer with quick-release water-soluble nitrogen, as it can be easily leached out of the plant’s root zone and may damage the roots.
Once your tree or shrub becomes established and if it’s located in or adjacent to a lawn area, there will probably be adequate fertilizer reaching the roots if you regularly fertilize your lawn.
Watering Newly Planted Trees and Shrubs
Once a tree or shrub is planted, it will require special attention for the next two to three years. This is when it will be developing new roots to support canopy growth. During this time, the soil in the root zone and surrounding area should be kept moist so that the roots will grow out of the root ball into the backfill soil of the planting hole and then into the surrounding soil.
In many areas of Washington state, this will require regular irrigation, especially during the summer months. However, adequate soil moisture is necessary for root growth not only during the summer but also in spring, fall, and even winter months when the temperatures are mild and the soil is not frozen.
The frequency and duration of watering should vary with soil type, weather, and the method of application. Don’t just rely on the appearance of the soil surface or wait until the plant appears to be under stress. New tree and shrub owners should regularly monitor both the moisture in the root ball and the surrounding soil. This can be done using a trowel or shovel to carefully dig down and make certain that the root ball and surrounding soil are moist.
Not only do roots need moisture for growth, they also need air. Saturated soils exclude air and result in root death. Monitoring will help you avoid overwatering.
A slow dribble from the end of a regular hose or a soaker hose is a good way to water a tree or shrub. This provides for deep watering without saturating the soil. As already noted, constructing a temporary soil berm or saucer around the periphery of the planting hole can be helpful in directing water towards the roots of newly planted specimens (Figures 2 and 4). The berm should be removed before winter to protect against water pooling and freezing at the base of the plant.
Continue to monitor the moisture in the root ball and surrounding soil as the tree or shrub grows and becomes established. Proper watering is critical to your plant’s success.
References
- Appleton, B. and J. Flott. 2009. Bare root to bare root—coming full circle, pp. 182-190. In Watson, G.W., L. Costello, B. Scharenbroch and E. Gilman, eds. The Landscape Below Ground III. Champaign, IL: International Society of Arboriculture.
- Chalker-Scott, L. and T. Stout. 2009. Bare-rooting containerized materials: a comparison of installation techniques, pp. 191-204. In Watson, G.W., L. Costello, B. Scharenbroch, and E. Gilman, eds. The Landscape Below Ground III. Champaign, IL: International Society of Arboriculture.
- Day, S.D. and J.R. Harris. 2007. Fertilization of red maple (Acer rubrum) and littleleaf linden (Tilia cordata) trees at recommended rates does not aid tree establishment. Arboriculture & Urban Forestry 33: 113-121.
- Gilman, E.F., Maria Paz, and Chris Harchick. 2009. Impact of container root ball pruning strategies on root system quality and tree stability, pp. 237-241. In Watson, G.W., L. Costello, B. Scharenbroch, and E. Gilman, eds. The Landscape Below Ground III. Champaign, IL: International Society of Arboriculture.
- Harris, R.W., J.R. Clark, and N.P. Matheny. 2004. Arboriculture: Integrated Management of Landscape Trees, Shrubs, and Vines. Upper Saddle River, NJ: Prentice Hall.
- Hummel, R.L., E. Evans, and R. Riley. 2009. Effect of mechanical root disruption at transplant on short- and longer-term growth and survival of Scotch pine (Pinus sylvestris) and shore pine (Pinus contorta var. contorta), pp. 211-221. In Watson, G.W., L. Costello, B. Scharenbroch, and E. Gilman eds. The Landscape Below Ground III. Champaign, IL: International Society of Arboriculture.
- Struve, D.K. 2002. A review of shade tree nitrogen fertilization research in the United States. Journal of Arboriculture 28: 252-263.
- Watson, G.W. 1994. Introduction, p. vii. In Watson, G.W. and D. Neely, eds. The Landscape Below Ground. Champaign, IL: International Society of Arboriculture.
- Watson, G.W. and E.B. Himelick. 1997. Principles and Practice of Planting Trees and Shrubs. Champaign, IL: International Society of Arboriculture.

By Marianne C. Ophardt, WSU Benton County Extension Director, Kennewick, WA, and Rita L. Hummel, Associate Professor, WSU Puyallup Research and Extension Center.
All figures by Rita Hummel except 2, 4, 5, 8, 12, 14B and 14c, and 15, which are thanks to Ray Maleike. Copyright 2011, Washington State University
WSU Extension bulletins contain material written and produced for public distribution. Alternate formats of our educational materials are available upon request for persons with disabilities. Please contact Washington State University Extension for more information.
You may order copies of this and other publications from WSU Extension or call 1-800-723-1763.
Issued by Washington State University Extension and the U.S. Department of Agriculture in furtherance of the Acts of May 8 and June 30, 1914. Extension programs and policies are consistent with federal and state laws and regulations on nondiscrimination regarding race, sex, religion, age, color, creed, and national or ethnic origin; physical, mental, or sensory disability; marital status or sexual orientation; and status as a Vietnam-era or disabled veteran. Evidence of noncompliance may be reported through your local WSU Extension office. Trade names have been used to simplify information; no endorsement is intended. Published December 2011.