Description
Table of Contents
-
Seed Selection
- What are seeds?
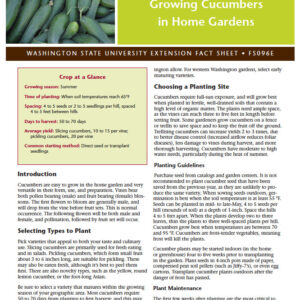
- What plants are generally propagated by seeds?
- Can seeds from previous years be used for the current year’s planting?
- Can seeds collected from my garden be used for the current year’s planting?
- What are the attributes of quality seeds? Where can I buy them?

Many annual and perennial plants can be propagated from seeds. Although growing plants from seeds is relatively easy compared to other methods of multiplying plants, it can be challenging due to the specific germination requirements of certain seeds. In general, such requirements are related to overcoming various kinds of germination inhibitions. This publication provides information on how to germinate seeds and grow them into healthy plants.
Seed Selection
Before you start, it will be helpful to learn about the seeds you’ll be dealing with so you can ensure the process of propagation goes smoothly and ask specific questions pertaining to seed propagation.
What are seeds?
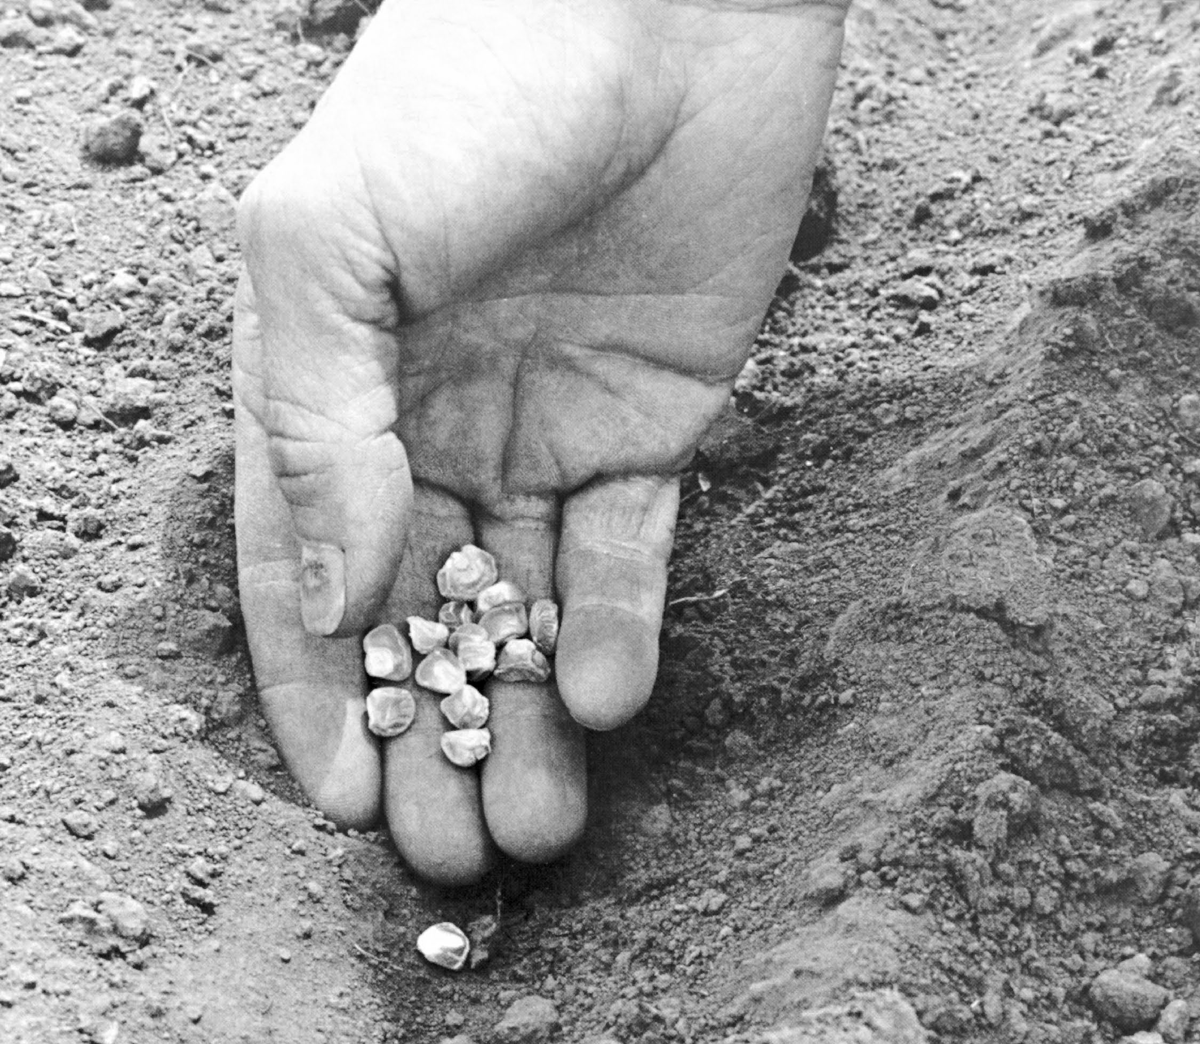
To a botanist, a “seed” is a specialized plant structure, complete with a tiny embryo, which is capable of growing into a new plant. Each seed has an embryo and food storage structures enclosed in a seedcoat (Fig. 1). Under conditions favorable for germination, the embryo develops into a mature plant as it is nourished by the food reserves in the storage structures, sometimes in tissue called an endosperm and sometimes in the cotyledons.
For a horticulturist, seed sometimes refers to any part of a plant capable of regenerating into a new plant. For example, in commercial cultivation of potato, the tuber is used as a vegetative propagule rather than the botanical seeds. Vegetatively propagated plants closely resemble their parent plants. To simplify, a potato tuber is referred to as a seed-tuber.
What plants are generally propagated by seeds?
Although most plants produce seeds, seed propagation is most common for grains, vegetables, annual flowers, and easy-to-grow perennials. Seed propagation is less often used to grow woody plants such as fruit and woody ornamentals and some of the more difficult-to-germinate perennials. This is especially true for hybrid or highly selected plants where new plants grown from seed rarely resemble the parents.
Although seed-propagated perennials take several years to flower and fruit, the method is often preferred. For example, nurseries raise rootstocks for grafting from seeds because seed propagation can give raise to seedlings that may be superior to their parents. Many native plant nurseries propagate from seeds to enhance gardening
diversity and stagger the timing of fruit production to sustain wildlife.
Can seeds from previous years be used for the current year’s planting?
It is best to buy fresh seeds in amounts sufficient for the current season’s planting, but most vegetable and annual flower seeds from the previous year germinate quite well if stored in moisture-proof containers in a refrigerator (4°C or 39°F).
How long seeds can be stored without appreciable loss in viability depends primarily on the nature of the seed, its moisture content, and the temperature and relative humidity during storage. Improperly dried seeds can rapidly lose viability in storage, which is why moisture-proof containers are important. Most medicine pill and vitamin bottles with screw-on caps can be used for storing seeds. They often come with a small packet of silica gel that works as a drying agent. Make sure the lid is closed tightly to prevent moisture getting into the container. A list of selected vegetable and flower crops and their average longevity is presented in Table 1.
Can seeds collected from my garden be used for the current year’s planting?
Seeds collected at the proper maturity and stored well can be used for planting in subsequent years. However:
- Avoid seeds from hybrid plants such as tomatoes and corn and those that are cross-pollinated such as pumpkin and squash since the plants from collected seeds will likely differ from the parent plants. To maintain consistency in cultivar characteristics, purchase new seeds of these kinds of plants every year.
- Avoid seeds from diseased plants.
| Longevity | Vegetable seeds | Flower seeds |
|---|---|---|
| 5 | Cardoon, Collards, Cucumber, Endive, Garden cress, Muskmelon, Radish, Water cress | Carnation, Chrysanthemum, Hollyhock, Nasturtium, Salpiglossis, Sweet sultans, Zinnia |
| 4 | Beets, Brussels sprouts, Cabbage, Cauliflower, Chicory, Eggplant, Fennel, Kale, Mustard, Pumpkin, Rutabaga, Sorrel, Squash, Swiss chard, Tomato, Turnip, Watermelon | Sweet alyssum |
| 3 | Asparagus, Beans, Brussels sprouts, Carrot, Celeriac, Celery, Chervil, Chinese cabbage, Kohlrabi, New Zealand Spinich, Pea, Spinach, Roselle | African daisy, Cosmos, Dusty miller, Marigold, Pansy, Petunia, Scabiosa, Shasta daisy, Snapdragon, Verbena |
| 2 | Ciboule, Dandelion, Leek, Marynia, Sweet corn, Okra, Pepper | Aster, Phlox, Sweet pea |
| 1 | Lettuce, Onion, Parsley, Parsnip, Salsify, Sea kale | Delphinium |
Source: Adapted from Bienz D.R. 1980. The why and how of home horticulture. W.H. Freeman and Company, New York.
What are the attributes of quality seeds? Where can I buy them?
Seeds should be true to the cultivar indicated on the package. High germination percentages
(85%–90%) will produce a larger batch of seedlings. Freedom from extraneous matter such as dirt, twigs, other crop and/or weed seeds, and seed-borne diseases are other important attributes of a good quality seed. Since seed viability and germination percentages can decline in storage, it is preferable to buy seeds produced from the previous year’s seed crop.
Buy certified seeds from a reputable seed company. Certified vegetable and ornamental plant seeds are sold at the beginning of spring in most retail outlets. You can also mail-order seeds from catalogues or online. Prior to placing your order, confirm that
the selected plants are suitable for growing in your region. The local growing season should be sufficient enough to allow the selected plant to
reach maturity. In areas with short growing periods (3–5 months), some may fail to reach maturity. Refer to Table 2 for the crop duration. Your local county Extension office will also be able to advise you on what plants grow well in your area.
| Vegetable | Seed depth to plant (inches) | Seeds to sow per foot of row | Plant spacing (inches) | Row spacing (inches) | Days for seed to germinate | Needs light to germinate | Soil temperature requirement | Weeks to grow to transplant size | Days to maturity |
|---|---|---|---|---|---|---|---|---|---|
| Asparagus | 1½ | n/a | 18 | 36 | 7–21 | No | Tolerates cool soil | 1 year | 3 years |
| Asparagus Lettuce | n/a | 8–10 | 12 | 18 | 4–10 | No | Tolerates cool soil | 4–6 | 80 |
| Beans: Snap Bush | 1½–2 | 6–8 | 2–3 | 18–30 | 6–14 | No | Needs warm soil | Not applicable | 45–65 |
| Beans: Snap Pole | 1½–2 | 4–6 | 4–6 | 36–48 | 6–14 | No | Needs warm soil | Not applicable | 60–70 |
| Beans: Lima Bush | 1½–2 | 5–8 | 3–6 | 24–30 | 7–12 | No | Needs warm soil | Not applicable | 60–80 |
| Beans: Lima Pole Garbanzo | 1½–2 | 4–5 | 6–10 | 30–36 | 7–12 | No | Needs warm soil | Not applicable | 85–90 |
| Chick Pea | 1½–2 | 5–8 | 3–4 | 24–30 | 6–12 | No | Needs warm soil | Not applicable | 105 |
| Scarlet Runner | 1½–2 | 4–6 | 4–6 | 36–48 | 6–14 | No | Needs warm soil | Not applicable | 60–70 |
| Soybean | 1½–2 | 6–8 | 2–3 | 24–30 | 6–14 | No | Needs warm soil | Not applicable | 95–100 |
| Beets | ½–1 | 10–15 | 2 | 12–18 | 7–10 | No | Tolerates cool soil | Not applicable | 55–65 |
| Buck-eye Cowpea | ½–1 | 5–8 | 3–4 | 24–30 | 7–10 | No | Needs warm soil | Not applicable | 65–80 |
| Yardlong Bean | ½–1 | 2–4 | 12–24 | 24–36 | 6–13 | No | Needs warm soil | Not applicable | 65–80 |
| Broccoli, sprouting | ½ | 10–15 | 14–18 | 24–30 | 3–10 | No | Tolerates cool soil | 5–7** | 60–80T‡‡ |
| Brussels Sprouts | ½ | 10–15 | 12–18 | 24–30 | 3–10 | No | Tolerates cool soil | 4–6** | 80–90T‡‡ |
| Cabbage | ½ | 8–10 | 12–20 | 24–30 | 4–10 | No | Tolerates cool soil | 5–7** | 65–95T‡‡ |
| Cabbage, Chinese | ½ | 8–16 | 10–12 | 18–24 | 4–10 | No | Tolerates cool soil | 4–6 | 80–90 |
| Cardoon | ½ | 4–6 | 18 | 36 | 8–14 | No | Tolerates cool soil | 8 | 120–150 |
| Carrot | ¼ | 15–20 | 1–2 | 14–24 | 10–17 | No | Tolerates cool soil | Not applicable | 60–80 |
| Cauliflower | ½ | 8–10 | 18 | 30–36 | 4–10 | No | Needs cool soil and Tolerates cool soil | 5–7** | 55–65T‡‡ |
| Celeriac | 1/8 | 8–12 | 8 | 24–30 | 9–21 | No | Needs cool soil | 10–12** | 90–120T‡‡ |
| Celery | 1/8 | 8–12 | 8 | 24–30 | 9–21 | Yes | n/a | 10–12** | 90–120T‡‡ |
| Chard, Swiss | 1 | 6–10 | 4–8 | 18–24 | 7–10 | No | Tolerates cool soil | Not applicable | 55–65 |
| Chicory—Witloof (Belgian Endive) | ¼ | 8–10 | 4–8 | 18–24 | 5–12 | Yes | Tolerates cool soil | Not applicable | 90–120 |
| Chives | ½ | 8–10 | 8 | 10–16 | 8–12 | No | Tolerates cool soil | Not applicable | 80–90 |
| Chop Suey Green (Shungiku) | ½ | 6 | 2–3 | 10–12 | 5–14 | No | Tolerates cool soil | Not applicable | 42 |
| Collards | ¼ | 10–12 | 10–15 | 24–30 | 4–10 | No | Tolerates cool soil | 4–6** | 65–85T‡‡ |
| Corn, Sweet | 2 | 4–6 | 10–14 | 30–36 | 6–10 | No | Needs warm soil | Not applicable | 60–90 |
| Corn Salad | ½ | 8–10 | 4–6 | 12–16 | 7–10 | No | Tolerates cool soil | Not applicable | 45–55 |
| Cress, Garden | ¼ | 10–12 | 2–3 | 12–16 | 4–10 | Yes | Tolerates cool soil | Not applicable | 25–45 |
| Cucumber | 1 | 3–5 | 12 | 48–72 | 6–10 | No | Needs warm soil | 4 | 55–65 |
| Dandelion | ½ | 6–10 | 8–10 | 12–16 | 7–14 | Yes | Tolerates cool soil | Not applicable | 70–90 |
| Eggplant | ¼–½ | 8–12 | 18 | 36 | 7–14 | No | Needs warm soil | 6–9** | 75–95T‡‡ |
| Endive | ½ | 4–6 | 9–12 | 12–24 | 5–9 | No | Tolerates cool soil | 4–6 | 60–90 |
| Fennel, Florence | ½ | 8–12 | 6 | 18–24 | 6–17 | No | Tolerates cool soil | Not applicable | 120 |
| Garlic | 1 | n/a | 2–4 | 12–18 | 6–10 | No | Tolerates cool soil | Not applicable | 90–sets |
| Ground Cherry | ½ | 6 | 24 | 36 | 6–13 | No | Needs warm soil | 6** | 90–100T‡‡ |
| Horseradish: Div. | n/a | n/a | 10–18 | 24 | n/a | No | Tolerates cool soil | Not applicable | 6–8 |
| Jerusalem Artichoke: Tubers | 4 | n/a | 15–24 | 30–60 | n/a | No | Tolerates cool soil | Not applicable | 100–105 |
| Kale | ½ | 8–12 | 8–12 | 18–24 | 3–10 | No | Tolerates cool soil | 4–6 | 55–80 |
| Kohlrabi | ½ | 8–12 | 3–4 | 18–24 | 3–10 | No | Tolerates cool soil | 4–6 | 60–70 |
| Leeks | ½–1 | 8–12 | 2–4 | 12–18 | 7–12 | No | Tolerates cool soil | 10–12 | 80–90T‡‡ |
| Lettuce: Head | ¼–½ | 4–8 | 12–14 | 18–24 | 4–10 | Yes | Needs cool soil | 3–5 | 55–80 |
| Lettuce: Leaf | ¼–½ | 8–12 | 4–6 | 12–18 | 4–10 | Yes | Needs cool soil | 3–5 | 45–60 |
| Muskmelon | n/a | 3–6 | 12 | 48–72 | 4–8 | No | Needs warm soil | 3–4 | 75–100 |
| Mustard | ½ | 8–10 | 2–6 | 12–18 | 3–10 | Yes | Tolerates cool soil | Not applicable | 40–60 |
| Nasturtium | ½–1 | 4–8 | 4–10 | 18–36 | n/a | No | Tolerates cool soil | Not applicable | 50–60 |
| Onion: Sets | 1–2 | n/a | 2–3 | 12–24 | n/a | No | Needs cool soil | Not applicable | 95–120 |
| Onion: Plants | 2–3 | n/a | 2–3 | 12–24 | n/a | No | Needs cool soil | 8 | 95–120T‡‡ |
| Onion: Seed | ½ | 10–15 | 2–3 | 12–24 | 7–12 | No | Needs cool soil | Not applicable | 100–165 |
| Parsley | ¼–½ | 10–15 | 3–6 | 12–20 | 14–28 | No | Tolerates cool soil | 8 | 85–90 |
| Parsnips | ½ | 8–12 | 3–4 | 16–24 | 15–25 | No | Tolerates cool soil | Not applicable | 100–120 |
| Peas | 2 | 6–7 | 2–3 | 18–30 | 6–15 | No | Needs cool soil | Not applicable | 65–85 |
| Peanut | 1½ | 2–3 | 6–10 | 30 | n/a | No | Needs warm soil | Not applicable | 100–120 |
| Peppers | ¼ | 6–8 | 18–24 | 24–36 | 10–20 | No | Needs warm soil | 6–8 | 60–80T‡‡ |
| Potato: Tuber | 4 | 1 | 12 | 24–36 | 8–16 | No | Tolerates cool soil | Not applicable | 90–105 |
| Pumpkin | 1–1½ | 2 | 30 | 72–120 | 6–10 | No | Needs warm soil | Not applicable | 70–110 |
| Radish | ½ | 14–16 | 1–2 | 6–12 | 3–10 | No | Needs cool soil | Not applicable | 20–50 |
| Rutabaga | ½ | 4–6 | 8–12 | 18–24 | 3–10 | No | Tolerates cool soil | Not applicable | 80–90 |
| Salsify | ½ | 8–12 | 2–3 | 16–18 | n/a | No | Needs cool soil | Not applicable | 110–150 |
| Salsify, Black | ½ | 8–12 | 2–3 | 16–18 | n/a | No | Needs cool soil | Not applicable | 110–150 |
| Shallot: Bulb | 1 | n/a | 2–4 | 12–18 | n/a | No | Tolerates cool soil | Not applicable | 60–75 |
| Spinach | ½ | 10–12 | 2–4 | 12–14 | 6–14 | No | Needs cool soil | Not applicable | 40–65 |
| Spinach: Malabar | ½ | 4–6 | 12 | 12 | 10 | No | Tolerates cool soil | Not applicable | 70 |
| Spinach: New Zealand | 1½ | 4–6 | 18 | 24 | 5–10 | No | Tolerates cool soil | Not applicable | 70–80 |
| Spinach: Tampala | ¼–½ | 6–10 | 4–6 | 24–30 | n/a | No | Tolerates cool soil | Not applicable | 21–42 |
| Squash (summer) | 1 | 4–6 | 16–24 | 36–60 | 3–12 | No | Needs warm soil | Not applicable | 50–60 |
| Squash (winter) | 1 | 1–2 | 24–48 | 72–120 | 6–10 | No | Needs warm soil | Not applicable | 85–120 |
| Sunflower | 1 | 2–3 | 16–24 | 36–48 | 7–12 | No | Needs warm soil | Not applicable | 80–90 |
| Sweet Potato: Plants | n/a | n/a | 12–18 | 36–48 | n/a | No | Needs warm soil | Not applicable | 120 |
| Tomato | ½ | n/a | 18–36 | 36–60 | 6–14 | No | Needs warm soil | 5–7 | 55–90T‡‡ |
| Turnip | ½ | n/a | 1–3 | 15–18 | 3–10 | No | Needs cool soil | Not applicable | 45–60 |
| Watermelon | 1 | 14–16 | 12–16 | 60 | 3–12 | No | Needs warm soil | Not applicable | 80–100 |
* Seeds that require cool soil do best in a temperature range of 50˚F–65˚F; those that tolerate cool soil in a 50˚F–85˚F range; those that require warm soil in a 65˚F–85˚F range.
† The variation of 4–6, 5–7, and 10–12 weeks allows for hotbed, greenhouse, and window sill environments, respectively, and under grow-lamp conditions. Generally the warmer the growing conditions, the shorter the time to grow transplants. However, allow for a change from indoor to outdoor environment.
‡ The relative length of time needed to grow a crop from seed or transplant to table use. The time will vary by variety and season.
** Transplants preferred over seed.
‡‡T = Number of days from setting out transplants; all others are from seeding.
Source: All about vegetables. Chevron Chemical Co. Garden Series by permission. Information on light from Dr. Henry M. Cathey.
Starting Plants Indoors for Later Outdoor Planting
When should I start my plants?
The seeds of many vegetable and ornamental plants can be sown directly in the ground where the growing season is sufficiently long (5–6 months). In shorter growing seasons, it is beneficial to start plants indoors early and transplant them outside once the frosty days are over and day and night temperatures are desirable for growth. A general guide on how early to start plants indoors is to check the time required from growing to transplanting size (see Table 2) and then count back from the average date of the last killing frost in your area. Planting seeds too early will result in stunted or spindly plants that die or produce little when transplanted outside. Plants started at the right time and handled properly will adjust and resume growth when moved outside.
Beside seeds, what else do I need to start plants?
Your seeds will require proper containers and growth media to sow and transplant once they reach the seedling stage. You should also know the germination requirements and means of providing them—for seeds of many plants, this means sufficient water (moisture) and optimum temperature. Although some seeds also need
darkness to germinate, others benefit from exposure to light (Table 3).
| Temperature | Light | Dark | Light/Dark |
|---|---|---|---|
| 55 | n/a | Larkspur White Supreme (20) Myosotis Ball Early (8) Sweet Pea Ruth Cuthbertson (15) | Lupine Giant King Oxford Blue (20) |
| 60 | Dill (10) | Gazania-Mix (8) Cynoglossum-Firmament (5) Cyclamen Pure White (50) Schizanthus Ball Giant Mix (20) | Chives-Grass Onion (10) Hollyhock Powderpuffs Mix (25) |
| 65 | Begonia (Tuberous-rooted double mix) (15) Coleus Red Rainbow (10) Gloxinia Emperor Wilhelm (15) Perilla Burgandy (15) Savory, Bohnenkraut (15) Snapdragon Orchid Rocket (10) | Centurea Blue Boy (10) Centurea Dusty Miller (10) Didiscus Blue Lace (15) Fennel, sweet (10) Gomphrena rubra (15) Mesembryanthemum criniflorum (15) Nasturtium Golden Giant (8) Nemesia Fire King (5) Pansy Lake of Thun (10) Penstemon Sensation Mixture (10) Phlox glamour (10) Shamrock, True Irish (10) Verbena Torrid (20) Viola Blue Elf (10) | Freesia White Giant (25) Morning glory Heavenly Blue (5) |
| 70 | Ageratum Blue Mink (5) Begonia, Fibrous-rooted Scandinavian Pink (15) Browalli Sapphire (15) Browallia Blue Bells (15) Browallia Silver Bells (15) Calceolaria multiflora nana (15) Cuphea Firefly (8) Exacum Tiddly-Winks (15) Feverfew Ball Double White Improved (15) Helichrysum (Everlasting) (5) Impatiens Holstii Scarlet (15) Kalanchoe Vulcan (10) Naegelia Art Shades (15) Nicotiana Crimson Bedder (20) Petunia Maytime (10) Primula Fasbender’s Red (25) Primula Malcoides White Giant (25) Saintpaulia Blue Fairy Tale (25) Salvia St John’s Fire (15) Streptocarpus (15) | Ageratum Golden (5) Borage (8) Coriander -annual (10) Calendula Orange Coronet (10) Centuria-yellow (10) Primula Chinese Giant Fringed (25) Sage, perennial (15) Salpiglossis Emperor Mix (15) Tithonia Torch (20) Vinca, Periwinkle-alba aculata (15) | Alyssum Carpet of Snow (5) Amaranthus Molten Fire (10) Aster Ball White (8) Anise (10) Balsam Scarlet (8) Basil Dark Opal (10) Basil Lettuce Leaves (10) Companula-Annual Mix (20) Candytuft Giant White (8) Carnation Chaband’s Giant (20) Carnation Imperial Cardinal Red (20) Celosia Toreador (10) Christmas Cherry Masterpiece (20) Cineraria-vivid (10) Cobea-Cupand Saucer Vine, purple (15) Clarkia (5) Cosmos Radiance (5) Dahlia-Unwins dwarf mix (5) Dianthus Bravo (5) Dimorphotheca Orange Improved (10) Gaillardia Terra Red Giant (20) Gypsophila Covent Garden (10) Heloitrope Marine (25) Hunnemannia (BushEscholtzia) Sunlite (15) Kochia Bright Green (15) Lobelia Crystal Palace (20) Marigold Doubloon (5) Marigold Spry (5) Marjoram, Sweet (8) Migonette Early White (5) Nierembergia Purple Robe (15) Plumbago, blue (25) Rudbeckia Single Gloriosa Daisy (20) Scabiosa Giant Blue (10) Statice Iceberg (15) Stock, Lavendar Column (10) Thunbergia gibsoni (10) Thyme, perennial (10) Torenia (15) Wallflower Golden Standard (5) Zinnia Isabellina |
| 75 | Cineraria Maritima Diamond (10) | Smilax (30) | Plumbago, blue (25 Thyme, perennial (10) |
| 80 | Grevillea (Australian Silk Oak) (20) Mimosa (sensitive plant) (8) | Mimosa (sensitive plant) (8) | n/a |
Modified from Cathey H.M. 1969. Guidelines for germination of annual, pot plants, and ornamental herb seeds. Florists’ Review 144: 26-29, 75-77. By permission of Dr. Henry M. Cathey.
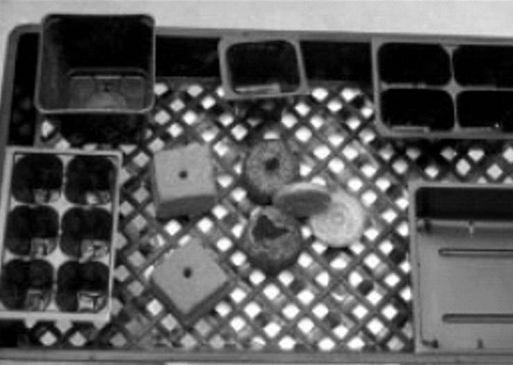
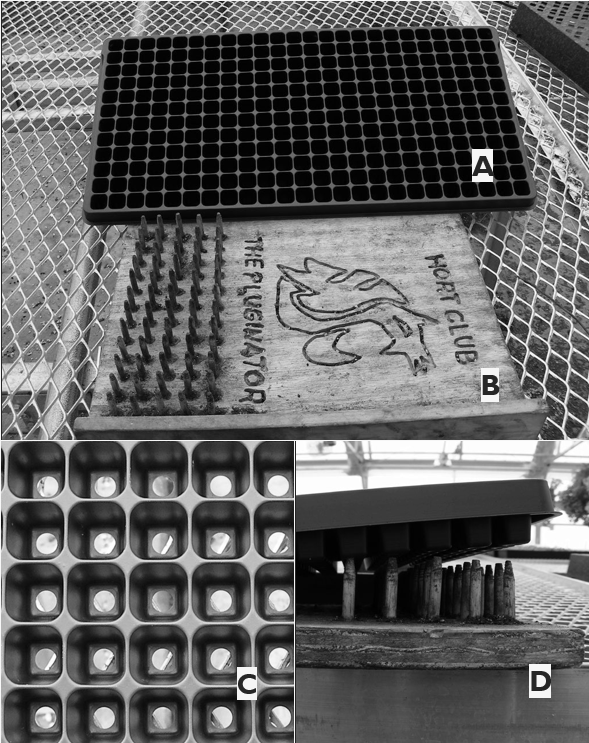
Containers for germination
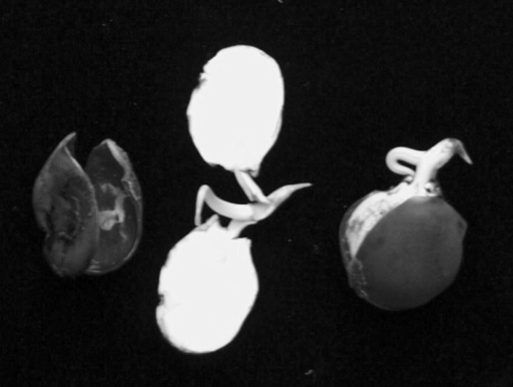
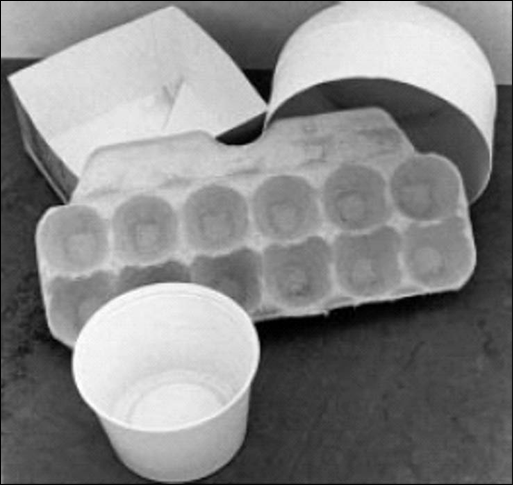
You can germinate seeds in a wide variety of containers available at retail outlets or recycled from other uses. Container options for sowing seeds
are described below and presented in Figs. 2–4. Containers should always be clean, and if the containers have previously held soil, they should be sterilized as well (see below under sanitation).
- Recycled plastic cottage cheese-type containers, the bottom part of milk cartons and bleach containers, aluminum foil pie pans, and used paper or plastic cups will work after being washed with soap and water to remove all traces of the original contents. Punch six or eight small holes in the bottom to provide drainage.
- Wooden or plastic flats can be purchased from garden stores or made from scrap lumber. A convenient size to handle is 12 inches long by 12 inches wide by 2 inches high. Leave cracks of about 1/8–3/16 inch between boards in the bottom.
- Clay or plastic flower-type pots are available at many garden, hardware, and variety stores. Recycled plastic pots work well.
- Pots made of peat or other organic materials are thin-walled, round or square, and come in sizes up to 4 inches. For starting seeds, many prefer the 1¾-inch square type. Once you fill them with a growth medium, you can start one plant in each pot. Although these peat pots are relatively expensive, their use eliminates transplanting prior to outdoor planting. When grouped together in a flat, these pots will support growing plants until outdoor planting. The plant’s roots will grow through the sides of the pot and you can ultimately place the pot outside in the soil with the plant.
- Plug trays are flat and come in a variety of cell sizes. Some of the advantages of plug trays include spacing and ease of separation of the seedlings; minimal root damage at transplant for quick transplant growth; and large, good quality seedlings at transplant. Thin seedlings to one seedling per cell after germination.
- Cell packs are small rectangular plastic pots joined together. Each “cell” or pot holds a single plant, which you remove from the pack for outdoor planting. The pack is then available for re-use after proper cleaning or sanitation.
- Peat pellets or discs are simply compressed peat that swells when moistened to form a cylinder approximately 1¾ inches in diameter and 2 inches high. They are held together by a fibrous net sleeve. Expanded, they act as a pot, growth medium, and nutrients for plant growth. Plant two or three seeds directly in the top of the expanded cylinder. After germination, thin the plants, leaving only one strong plant. This option is also relatively expensive but convenient.
- Fiber cubes are individualized plant-growing fiber blocks that contain fertilizer. Place seeds directly in the block after watering.
- Preplanted trays sold at grocery and garden stores need to have holes punched in the top, water, and the proper environment to facilitate germination.
Germination media
Prepared mixtures are available from garden stores for starting seedlings. These mixtures contain materials such as peat and vermiculite plus small quantities of plant nutrients. If you wish to make your own germination medium, use a mixture of two parts garden soil, one part peat or coir fiber, and one part medium to coarse sand. If the garden soil is high in clay, use a 1-1-1 mixture of these materials. For many seeds, commercial sterilized potting soil also works well.
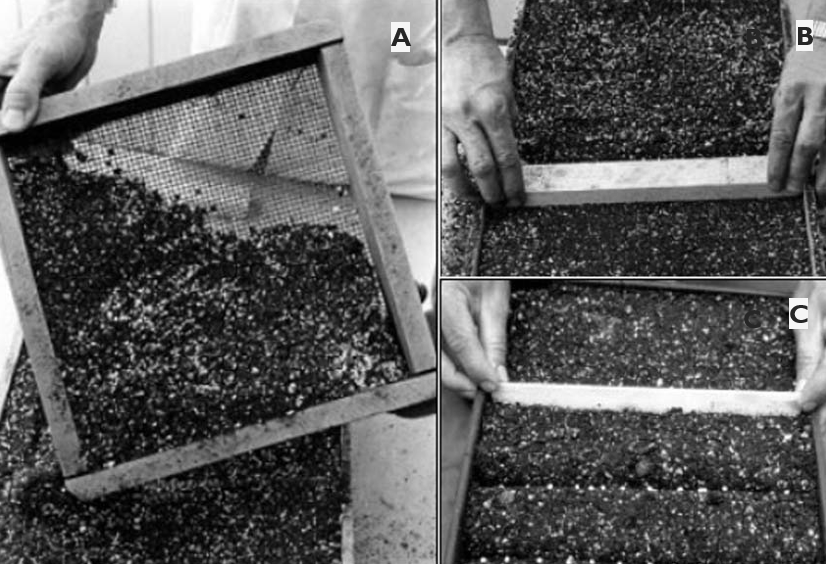
For small seeds such as petunia, sift the medium through a sieve similar to a window screen to remove large particles and provide a fine seedbed for germination (Fig. 5A), then fill the media into flats and level (Fig. 5B)
Sanitation: There is no need to sanitize the germination media sold in retail outlets and garden centers. If you prepare your own germination mix, sanitation will help ensure against disease-causing organisms. The only means usually available to most amateur gardeners is the kitchen oven. Heat the mix in a shallow metal tray or wooden flat. When the center of the mix reaches 140°F–150°F,
keep it at that temperature for 30–40 minutes. This treatment should eliminate most disease organisms, particularly those responsible for damping-off diseases that can cause sudden heavy losses of plants at the seedling stage. Be aware that the soil may cause some unpleasant odors so plan for good ventilation during the sterilization process or perform sanitation outdoors.
In addition to soil treatment, disinfect used growing containers, tools, and work benches and then keep them clean. Use soaks or drenches (usually one or two parts laundry bleach to eight or nine parts water) to achieve a 10–20% bleach solution. New growing containers do not require such treatment. Do not use bleach on live plants.
How do I sow seeds?
Place the germination mix in the selected container. Firm with your fingers at the container edges and corners, level even with the container top, and press down the entire surface lightly but firmly with the bottom of another pot of with the back of our hand. For very small seeds, use the fine-screened mix mentioned earlier for at least the top 1/4-inch.
For medium and large seeds, make furrows about 1 inch apart across the surface of the container (Fig. 5C). Individually space the large seeds. For medium-sized seeds, open the seed packet, hold in one hand, and lightly tap the packet with your index finger as you move down the furrow. This will distribute the seeds fairly evenly. Seedlings growing too close to each other will be crowded and spindly, so make sure to allow enough growing space based on the estimated seedling size when you plan to transplant.
Cover the seeds lightly with the screened growth mix. A suitable planting depth is usually equal to about twice the diameter of the seed. Small seeds like petunias or begonias need to be broadcasted over the surface of the germinating medium rather than in rows or furrows to allow maximum light for germination. After sowing, water the soil.
If you use peat pots, pellets, strips, cell packs, or other individualized plant containers, first expand the pellets by adding water. Fill the other individual containers with planting mix and firm them as with larger containers. Plant the seeds in the center of each small container or cell. For medium and large seeds, punch a small hole in the center of the potting mix of each container or cell, place two or three seeds in each hole, and cover the seeds as with larger containers. Place small seeds on the surface.
Labeling
It is helpful to label your pots and/or trays since many seedlings are difficult to distinguish. The label should include the plant name (common or botanical), cultivar, and date of sowing.
White plastic labels marked with a pencil are recommended for their ability to withstand sunlight and water.
Watering
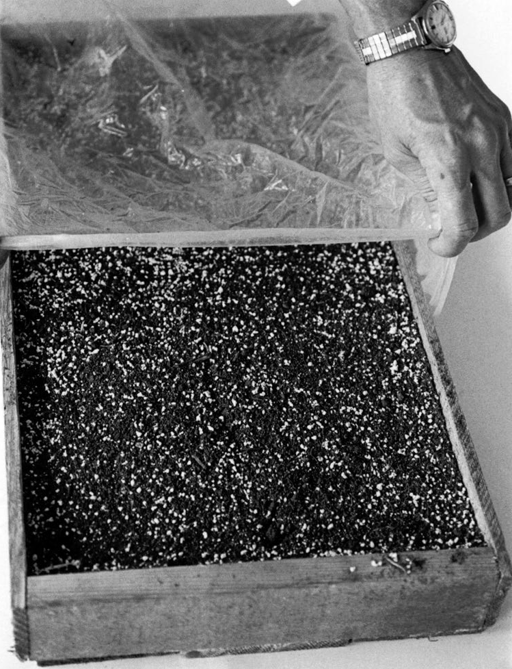
After you sow the seed, wet the planting mix. Place the containers in a pan, tray, or tub with about 1 inch of water in the bottom. When the water seeps upward through the container to the surface, remove the container and set aside to drain for an hour or two. Then slip the container in a clear plastic bag and tie shut (Fig. 6). You also can cover the containers with a pane of glass to hold in moisture.
Place the containers in a warm or cool place as required (see discussion on temperature), but not in direct sunlight. Some types of seed must be placed in the dark (see discussion on lighting).
Check each day to be sure the mix is still moist and if any plants have emerged. Once you see growth, remove the plastic or glass covering and place in full natural or artificial light, but be sure the seedlings and pots do not get too hot. Continue to check the moisture level of the mix. If water is needed, wet small seeded plants by seepage from below or add water to the top of
the container for medium and large seeded plants. Be careful not to over-water or wash out the seeds or plants.
Temperature
In general, most flower and vegetable seeds germinate rapidly at 75oF–80oF. At temperatures below 60oF, germination is sometimes slow,
and damage from damping-off (fungal disease) diseases can be a major problem. Some plants, however, germinate better at 50oF–65oF. See Tables 1 and 2 for favorable germination temperatures of a variety of garden plants. Be sure to check the directions on the seed packet if you have purchased the seeds.
Take advantage of the temperature variations within your home to give the right temperature conditions for seed germination. You can more precisely raise the temperature of the germinating medium by placing the containers on top of thermostatically-controlled heating cables/mats (Fig. 7).
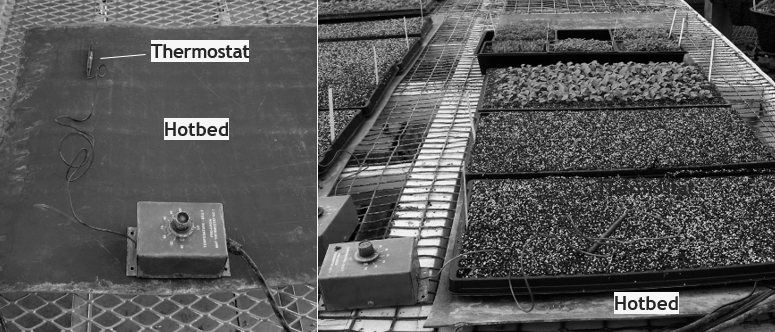
The bottom heat from the hot bed facilitates uniform germination (right).
Light
Light holds back the germination of some seed, whereas other seeds require light for germination. Many will germinate in either light or dark. Of the common garden vegetable crops, only a few are affected significantly by light. Table 3 shows the light requirements for a number of garden plants to germinate.
After germinating from seeds, plants require adequate lighting for good growth. Placing containers near a well-lighted window through the day often is adequate. Since the plants will bend toward the light from the window, turn the containers daily to prevent permanent bending in the stems and allow sturdier plants to develop. If the plants’ stems become elongated and “stringy,” consider adding artificial light as described below.
If a place with good natural light is unavailable, provide artificial light. Even where you find good natural light, supplementing it with artificial light will extend the day length and improve plant growth.
A fluorescent fixture with a 40-watt cool, warm white, or grow-type tube provides a good source of light. Suspend about 10–12 inches above small plants for 14–16 hours per day. Timing devices (time clocks) available at hardware stores will allow you to turn the lights on and off automatically.
Incandescent lights can be used along with fluorescent lights, but since these generate heat, tender seedlings may get stressed if placed too close. Accordingly, make sure that incandescent lights are 18 inches above the canopy level.
How do I transplant seedlings?
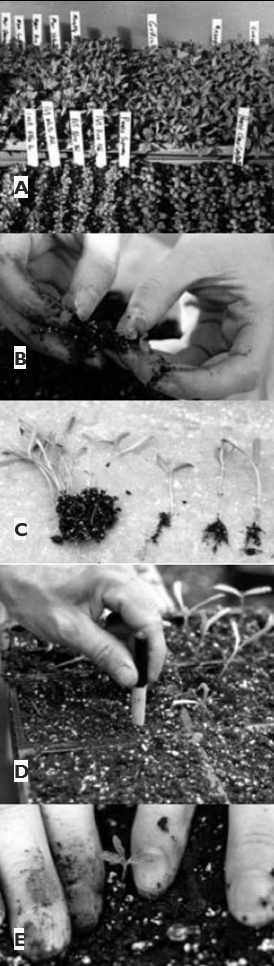
If you did not place seed in individualized containers, you will need to transplant them to give greater growing space and allow proper plant development. Figs. 8A–E illustrate the process of transplanting seedlings.
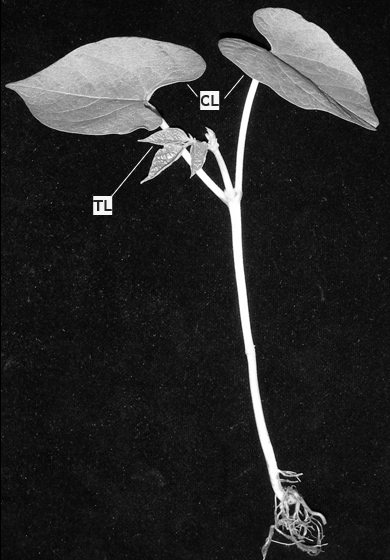
Seedlings can be transplanted once they develop their first true leaves. Do not confuse the cotyledons (sometimes called seed leaves) with true leaves, which have quite a different appearance (Fig. 9). Failure to transplant in a timely manner may result in undesirable plant characteristics such as spindly or overdeveloped plants that may not grow properly.
You can purchase media or mixes for growing seedlings (or use commercial potting soil) that are similar to those used for germinating seeds but with more plant nutrients. You can prepare your own mix like that described for seedlings following the same precautions for sanitation.
Fill growing containers as described for germinating seeds. In flats, mark rows about 2 inches apart. Using a sharpened pencil, make holes about 2 inches apart along the row for individual plants.
Several approaches can help you extract plants from their germinating containers. First, water the seedlings. If they were germinated in a very loose mix, you usually can lift them out gently with the tip of a pencil or with a spoon with little damage to roots. However, if the mix contains sand and garden soil, it will be more compact. In this case, you can cut the mix in a flat into sections as if you were cutting
a cake. Lift out a section at a time. If you used pots, remove the entire contents at once.
Gently break up each section by separating the plant roots and removing one plant at a time. Where a heavy intertwining root mass is present, place the sections in water in a clean bucket and gently agitate the mass. This action will wash away the soil, allowing you to separate the plants with little damage to the roots. Place the plants on moist newspaper while transplanting to prevent damage to the roots from drying. Discard spindly or poorly developed plants.
Hold each separated plant carefully by the top or the leaves and gently tuck the roots in the holes previously prepared in the flats or pots. However, be careful not to use a hole that is too shallow so that the roots form a “U” going down into the soil and back out. Attempt to keep the roots pointed downward. Plant the seedlings slightly deeper than they were in the germinating containers. Place soil or potting mix around each plant as you set it in place and gently firm the soil or mix around the stem and roots with your fingers.
After transplanting, water the plants by seepage from below or from the top using a fine spray, taking care to avoid wash out or flatten the plants with the water.
For a few days after transplanting, give plants special care to help them overcome transplanting shock. Covering the plants with a plastic bag to maintain high humidity will help prevent wilting. Keep plants away from drafts or high temperatures if in open flats and do not place in direct sun if covered with plastic.
Thinning
Thinning refers to the removal of all but the most vigorous, healthy plant in each container or cell. Thinning provides the best opportunity for seedling growth because it eliminates competition from
the neighboring seedlings for light, water, and nutrients. Thinning also reduces the incidence of diseases such as damping off.
How should I take care of transplants?
After transplanting, or with plants of the same age started in individualized containers, keep plants growing at a steady, rapid rate to be in good condition for outdoor planting. Transplants need good lighting, proper temperature, water, and mineral nutrients to grow well.
Light
Adequate light helps ensure good plant development. Poor lighting results in spindly, weak plants. If using natural light, be sure it is bright throughout the day. Artificial lighting can benefit plants by supplementing natural light intensity and day length. For most young plants, 14–16 hours of light daily is adequate. Keep the lights 10–12 inches above the plants.
Temperature
In addition to providing temperatures optimum for germination, the information in Table 2 provides growing temperatures for various plants. Most plants grow best between 60oF and 80oF. Maintain daytime temperatures between 70oF and 80oF and nighttime temperatures between 60oF and 70oF. Avoid exposing the plants to cold drafts.
Watering
At each watering, apply enough water to wet the entire volume of growing mix to have some drain through the bottom. Apply water early enough in the day so plant leaves dry before nightfall.
This helps prevent damping-off diseases. Apply water carefully to avoid washing out the plants or splashing soil or potting mix on the leaves. Keep the soil slightly moist to the touch but not waterlogged.
Fertilizer
If your plants have a pale green or otherwise discolored look, apply a water-soluble fertilizer that is generally used for houseplants at half strength. Seedlings may need fertilizer only once or twice before you plant them outdoors.
How do I acclimatize plants to outdoor conditions?
For best results, do not abruptly transfer seedlings from indoors to the uncertain outdoor climate.
Gradually acclimatize or toughen plants for about 2 weeks before planting them in your garden. Slowing down their rate of growth will prepare them to withstand conditions such as cold, drying winds, water shortage, and high temperatures.
You can harden plants by placing them outdoors in the daytime for one to two hours in partial shade. Over a period of a few days, gradually increase the time outdoors and move them into direct sunlight. Since plants grown indoors have no resistance to UV radiation, they need to acclimate slowly to sunlight or they will get “burned” upon exposure. One or two days before planting in your garden, leave plants outside during the night on the sidewalk or steps but not directly on the ground. During the hardening period, reduce water application but do not allow them to wilt. Plants will dry more quickly when exposed to outdoor conditions.
How can I achieve successful outdoor planting?
Prepare the planting area with a rototiller or by spading. Most areas need a balanced commercial fertilizer at 2 pounds of 16% nitrogen, 16% phosphorus, and 16% potassium (labeled as 16-16-16) or 3 pounds of a 10-10-10 per 100 square feet. It may save money in the long run to have your soil tested to determine what soil nutrients to add. Ask your county Extension office where such tests can be done or purchase your own soil testing kit at a gardening store.
Rake to smooth the surface, incorporate fertilizer, and remove clods and rocks. Mark rows and locations for individual plants and then dig holes and fill with water. When the water soaks into the soil, you are ready to plant. This ensures a ready supply of soil moisture to newly planted seedlings.
If your plants are in flats, cut the mix into cubes as if cutting cake, then lift the plants out individually.
If you used individual plastic or clay pots, place one hand on top of the pot with your fingers around the plant. Tip the pot upside down and tap the edge
of the pot on a table edge or another hard surface. The contents of the pot should fall out intact in your hand.
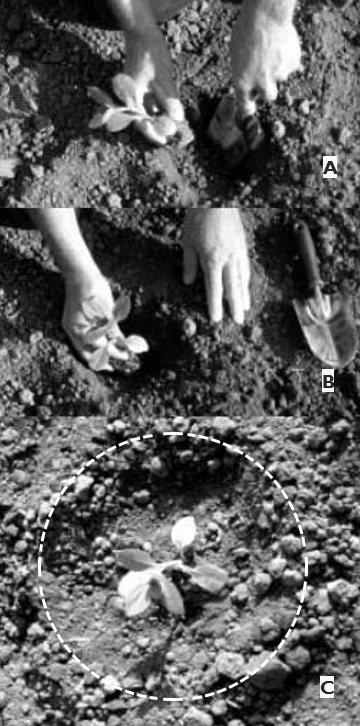
When setting the plants in your garden soil, use the same procedures and precautions about root placement as described for indoor transplanting. Set plants slightly deeper in the soil than they were previously growing (Fig. 10A) and firm the soil around the roots (Fig. 10B). You can place
containers such as peat pots, expanded pellets, and cubes directly in the garden soil. Be sure to plant these containers deep enough to cover the upper edges and surfaces with soil. If exposed, these surfaces sometimes act as a wick, resulting in rapid loss of moisture from around the plant’s roots.
After the plant is set, leave a slight dish-shaped depression around the stem (Fig. 10C). Fill this with water. You often can give transplants a boost by adding a starter fertilizer after setting them in the soil. Commercial mixes for this purpose are available, or you can make your own by dissolving 1/2 pound of a 5-10-5 commercial fertilizer in 4 gallons of water. After setting the plants, pour 1 cup of this solution in the dish-shaped depression around each plant instead of using plain water.
Choose a cloudy day for transplanting or wait until evening. Avoid windy or very cold days. The more moderate the conditions, the better the
seedlings’ survival. If conditions on the day following transplanting are very hot or windy, protect seedlings by pushing shingles into the soil on the sunny or windy side of each plant.
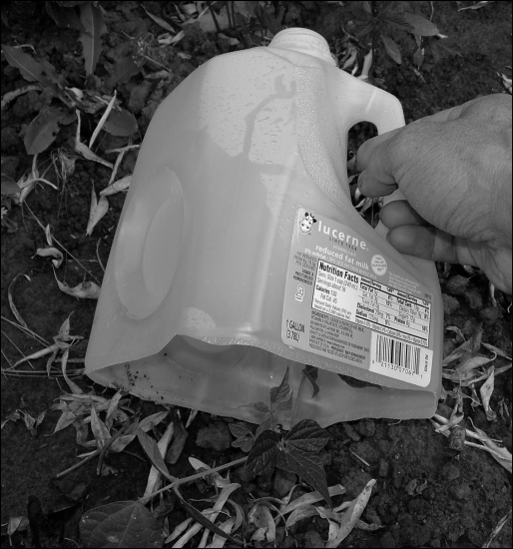
You can plant some plants (such as squash and melons) outdoors 1 or 2 weeks earlier by covering them with waxed paper “‘hotcaps.” Use plastic tunnels supported by wire frames to cover entire rows. Hotcaps and plastic tunnels trap heat from the soil to protect plants against light frosts. On warm days, check temperatures inside the hotcaps to be sure they are not too high. Cut venting slots on
the side away from the sun to reduce this problem. After you remove the bottom, gallon plastic jugs also work well as hotcaps (Fig. 11); venting is not a problem when you remove the cap.
Cold frames and hotbeds
Instead of starting plants indoors, you can start them in outdoor plant-growing structures called cold frames and hotbeds that may be purchased or home-made. These structures will harden plants before transplanting as well start seedlings. A cold frame is a box-like structure made with a glass or
transparent plastic top that traps heat from the sun. The frame is placed in a sunny, protected location on well-drained soil or 1–2 inches of sand. On very warm days, raise the glass cover slightly to prevent excess heat build-up. On cold nights, a blanket covering may be required to prevent freezing.
The addition of some form of internal heat to the cold frame converts it into a hotbed and thus improves its utility and extends its period of use. While manure or other heat-producing materials can provide a heat source, a thermostatically controlled heating cable is more precise.
Planting Seeds Outdoors
How do I plan and prepare the soil for outdoor planting?
Before you plant, determine the space required for each crop, the most desirable location for each, and the total area required. If the planting area is in sod, begin soil preparation in the fall before planting.
Spade or till the area about 8 inches deep and prepare as described earlier for transplants, with perhaps a bit more effort to obtain a good, smooth surface free of clods and refuse.
Do not begin soil preparation until the soil is dry enough to work properly or it will later become baked and unmanageable. Take a handful of soil and squeeze it into a ball. If the ball falls apart under slight pressure, the soil is dry enough. If it remains in a wet ball, wait for a few days. When the soil is prepared, mark the rows or other planting locations.
Where soil conditions such as drainage are not adequate for raising a successful garden, raised beds can be useful. A detailed method for the preparation of raised beds is outlined in Raised Bed Gardening
(FS 270), available from Oregon State University Extension.
Timing
Proper timing is important for good crop production. Do not rush the season by planting seeds sensitive to cool soil too early. Similarly, do not attempt to plant heat-sensitive seed in midsummer. Consult Table 2 to help determine timing.
Planting/sowing
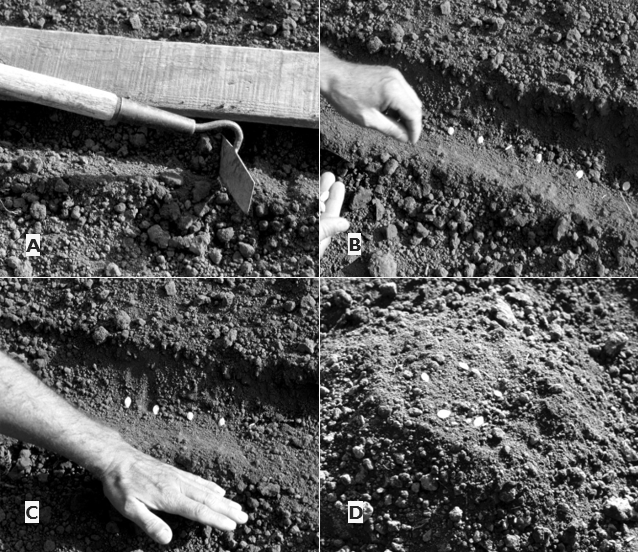
Follow the same guide for planting depth and sowing as for planting seeds indoors. Just as you should start very small seeds indoors, remember all seeds planted outdoors require some soil covering to maintain sufficient moisture for germination. Plant seeds very shallowly when they require light for germination. Enough light will penetrate the soil to stimulate germination. For early plantings of seeds sensitive to cool soil, plant them more shallowly than later plantings. The deeper you dig in the soil, the cooler it will be. Figs. 12A–D show how to open furrows and sow seeds in a garden.
If the small size of the seed (such as petunias and carrots) makes it difficult to achieve uniformity in sowing, pelleted or taped seeds (see below) are useful. Some seeds such as tomato are known for their erratic germination. When sown directly in the ground, soil temperature affects germination and
seedling emergence. For example, cooler temperatures can retard the germination of tomatoes and high temperatures can force lettuce seeds to become dormant.
Erratic and delayed germination results in poor plant emergence and delayed growth, resulting in slow maturity. Uniformity in germination and crop stand can be achieved by using primed or pre-germinated seeds (see below), which also work well in areas with shorter growing seasons.
Pelleted seed and seed tape. Pelleting involves coating seeds with materials such as clay to enhance uniformity in seed size and shape. Such seeds are easy to sow by mechanical seeders and are available from many seed companies.
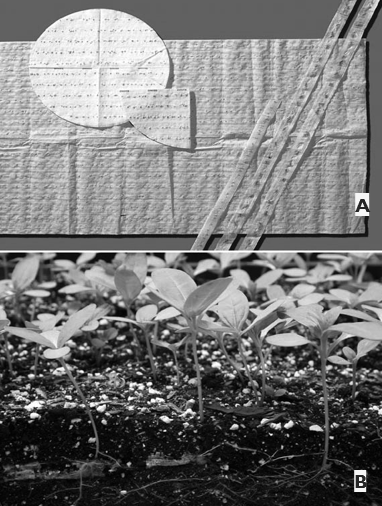
For some crops sown directly in the garden, seed tapes can be useful (Figs. 13A, B). You can either purchase commercial seed tape or make it using strips of newspaper or paper towels. Simply glue the seeds onto the paper strips/rolls using a water-based adhesive or cornstarch at the spacing specified for the crop, place in furrows at the proper depth, and cover with media.
Primed and pre-germinated seeds. Priming is a seed treatment that facilitates rapid and uniform germination. Priming is accomplished by allowing seeds to absorb (imbibe) a limited amount of water to trigger the initial physiological processes associated with germination. Primed seeds do not push their radicals out. This is because they absorb water from high osmotic solutions such as polyethylene glycol. Following priming, the seeds need to be dried and stored until they are sown. Because this process is fairly complex, it is advisable for a home gardener to buy rather than prepare primed seeds.
In contrast to conventional seeds, primed or pre-germinated seed results in faster germination and a more uniform crop stand. In temperate areas, low soil temperatures during sowing may inhibit or cause erratic germination. Low soil temperatures often result in seed mortality upon initial germination or during seedling emergence. Whatever the cause, the consequence is poor crop stand, immature produce at harvest, and reduced yields.
Primed seeds perform well even in areas with high soil temperatures. Germination of seeds such as lettuce is inhibited by high soil-temperatures (thermodormancy). However, primed or pre-germinated lettuce seeds are immune to high-temperature-induced dormancy that inhibits germination.
For a home gardener, pre-germinated seeds can be an alternative to primed seeds with comparable advantages. You can germinate seeds at home
in between folds of moist paper towels. When the radicals (roots) begin to emerge, sow the germinated seeds in the field. Pre-germinated seeds cannot be dried or stored. Since their tender radicals are easily damaged, care must be taken while sowing such seeds. To avoid damage, suspend the pre-germinated seeds in a gel. On home scale, prepare a gel by stirring cornstarch into boiling water to achieve a consistency that supports suspension of pre-germinated seeds. Let the cornstarch cool to room temperature before suspending the seeds in it. Note that the gel-like
consistency develops upon cooling. Pour the gel into a small plastic bag and suspend the pre-germinated seeds in it. Make a small hole in the bag and extrude the gel along with the seeds into prepared furrows. This technique is known as “fluid drilling.”
Watering and moisture control
After covering seeds to the proper depth, firm the soil by tamping lightly with the back of a hoe and sprinkle with a fine mist from a garden hose until the soil is moist. Keep the soil moist to the touch but not waterlogged. Seeds planted deeply will require less frequent watering than shallowly planted seeds. Those planted close to the surface may need light sprinkling several times daily until seeds germinate. If the soil is allowed to dry, it may crust and interfere with seedling emergence. To prevent crusting, spread a shallow mulch of sawdust, vermiculite, or bark dust over the rows.
Thinning
While thinning plants requires time and work, it is usually preferable to plant a few more seeds than necessary to ensure an adequate stand in case of adverse conditions and poor seed germination.
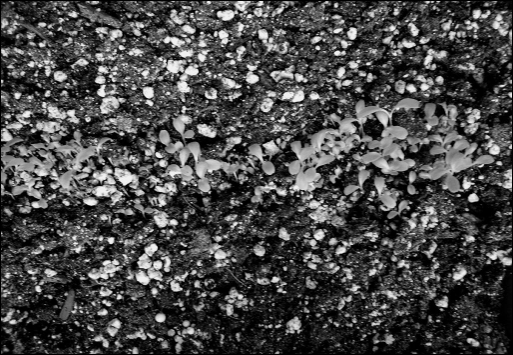
Thinning crowded plants allows full development of the remaining seedlings (Fig. 14). Final spacing depends upon the crop. Begin thinning as soon as germination is complete. Do not thin all at once, but go over the rows several times. If you carefully remove the first plants thinned out, you can transplant them to other areas. Consult Table 2 or seed packets for directions on plant-to-plant spacing before thinning.
Starting Perennials and Woody Plants from Seed
Unlike annuals, perennials and woody plants are long-lived, and their seeds sometimes require different treatments to facilitate germination. If perennials or woody plants are of hybrid origin, highly bred, or selected stock for desirable horticultural qualities, seeds grown from existing plants may differ (be either inferior or superior) from the parent plant. Although attempting to grow perennials and woody shrubs and trees from seed can be more difficult than growing most annuals, it can also be rewarding.
How do I prepare seeds of perennial plants?
One or more types of dormancy frequently affect seed from perennials and woody plants, so the following treatments individually or in combination may be required to promote germination.
Stratification
Stratification is a seed treatment used to overcome some kinds of chemical dormancy. To stratify seeds, first soak them overnight in water. Seeds with hard seedcoats may also require scarification (see below). For woody plants, following absorption of water (imbibition), decant water, soak seeds in
laundry bleach (diluted tenfold) for 10–20 minutes to achieve surface disinfection, and then wash seeds free of bleach.
The next step is to place seeds in moist sand, peat, or a plastic bag (Fig. 15) and hold them at a cold temperature. The seeds of most temperate plants require temperatures between 32°F and 50°F, called “moist chilling.” Most seeds that require
stratification should be kept between 30°F and 45°F, but again, the conditions are individual according to the seed. Below freezing can cause seed death from the formation of ice crystals.
The time of treatment varies with the type of seed, ranging from 1 to 6 months (Table 4). Some seeds require storage for varying periods at warm temperatures (50oF–80oF), while others need warm, moist temperatures followed by cool, moist storage. You often can obtain these same conditions naturally by the proper timing of outdoor planting: summer planting provides warm, moist conditions, while fall planting provides cool, moist conditions.
You can also stratify the seeds of temperate plants in a refrigerator or outdoors during cold winter months. To accomplish this, sow seeds in a 4-inch pot filled with a moist media such as perlite or peat moss. Place the pot in a gallon-size Ziploc bag, label the bag with the date of removal, and store in a refrigerator or place outdoors for the required number of days to complete the stratification requirement.

| Seed | Stratification period, days | Stratification temperature | Pre-stratification treatment |
|---|---|---|---|
| Almond | 60 | 41°F | n/a |
| American Plum | 90–180 | 41°F | Stratification at 60–70°F for 35 days |
| Apple | 30–90 | 32–50°F | n/a |
| Apricot | 45 | 41°F | n/a |
| Aralia | 90 | 35–40°F | Acid scarification for 30–40 minutes |
| Arbutus menziesii | 30–60 | 35–40°F | n/a |
| Aronia arbutifolia | 90 | 41°F | n/a |
| Aruncus dioicus | 30 | 40°F | n/a |
| Asimina triloba* | 90 | 40°F | n/a |
| Barberry | 15–40 | 32–41°F | n/a |
| Bergenia cordifolia | 40–60 | 41°F | n/a |
| Birch, Arborvitae | 30–60 | 32–50°F | n/a |
| Black Quercus | 30–90 | 32–35°F | n/a |
| Brodiaea spp. | 60 | 37°F | n/a |
| Calocedrus decurrens | 60 | 32–40°F | n/a |
| Celastrus | 90 | 40°F | n/a |
| Celtis (Hackberry) | 60–90 | 40°F | n/a |
| Cercis spp. (Red bud) | 90 | 35–40°F | Acid scarification for 30–60 minutes |
| Chaenomeles spp. (Flowering quince) | 60–90 | 40°F | n/a |
| Chamaecyparis spp. | 60–90 | 40°F | n/a |
| Cherry | 60–170 | 35–45°F | n/a |
| Chestnut (American) | 90–120 | 41°F | n/a |
| Clematis | 30–90 | 40°F | n/a |
| Cornus spp. (Dogwood) | 120 | 40°F | n/a |
| Cotoneaster | 90–120 | 40°F | Acid scarification for 90 minutes |
| Crataegus (English Hawthorn) | 150 | 40°F | Acid scarification for 60–120 minutes |
| Cupresses spp. | 15 | 35–40°F | n/a |
| Dicentra spp. | 45 | 41°F | n/a |
| Dictamnus albus (Gas plant) | 90–120 | 32–40°F | n/a |
| Dogwood | 60–70 | 70–85°F | n/a |
| Elaeagnus (Russian Olive) | 90 | 40°F | n/a |
| Elderberry | 90–150 | 40°F | Acid scarification for 15–30 minutes |
| Elm | 60–90 | 41°F | n/a |
| Euonymus | 90–120 | 32–50°F | n/a |
| Fagus spp. (Beech)* | 90 | 40°F | n/a |
| Filbert | 90 | 41°F | n/a |
| Fir | 30–90 | 41°F | n/a |
| Helleborus lividus** | 60–70 | 37°F | Warm stratification 70°F for 60–70 days |
| Heteromeles arbutifolia (Toyon) | 90 | 37–41°F | n/a |
| Hickory | 90–120 | 32–45°F | n/a |
| Holly | 60 | 68–86°F | n/a |
| Honey Locust | 90 | 36°F | Acid scarification for 60 minutes |
| Horse-Chestnut | 120 | 41°F | n/a |
| Juniperus spp. | 120 | 40°F | Acid scarification for 30 minutes |
| Lilac | 30–90 | 41°F | n/a |
| Magnolia | 90 | 40°F | Remove the inhibitory red pulp |
| Maple | 60–120 | 41°F | n/a |
| Mountain ash | 60–150 | 41–50°F | n/a |
| Myrica spp. (Bayberry) | 90 | 40°F | Remove the wax coating |
| Myrobalan Plum | 90 | 41°F | n/a |
| Parthenocissus spp. (Virginia creeper) | 60 | 40°F | n/a |
| Peach | 60 | 41°F | n/a |
| Pear | 60–90 | 32–40°F | n/a |
| Picea spp. (Spruce) | 60–90 | 40°F | n/a |
| Pine | 30–90 | 32–40°F | For species with embryo dormancy |
| Pistacia chinensis | 70–85 | 40–50°F | Soak seeds in water to remove pulp |
| Plum | 60–120 | 41°F | n/a |
| Sand Cherry | 90 | 41°F | n/a |
| Saskatoon berry* | 90–170 | 36°F | Acid scarification for 15–30 minutes |
| Spruce | 60–180 | 41°F | n/a |
| Sumac | 60–70 | 40°F | Acid scarification for 1–6 hours |
| Sweet Cherry | 60–90 | 40°F | Warm stratification at 70°F for 20 days |
| Taxus spp. (Yew) | 120 | 41°F | Stratification at 68°F for 90 days |
| Tilia spp. (Linden) | 120 | 35°F | Remove pericarp mechanically |
| Tsuga spp. (Hemlock) | 60–120 | 40°F | n/a |
| Ulmus spp. (Elm) | 60 | 40°F | Suitable for fall-ripening seeds |
| Walnut | 90–120 | 34–41°F | n/a |
*Recalcitrant seeds; drying reduces seed viability; **May take up to 2 years to germinate
Source: Larsen F.E., Schekel K.A. 2001. Seed propagation. Pacific Northwest Extension Publications.
Dirr M.A., Heuser C.W. Jr. 1987. The reference manual of woody plant propagation: From seed to tissue culture. Varsity Press, Inc., Georgia. Hartmann H.T., Kester D.E., Davies F., Geneve R. 2001. Plant propagation: Principles and practices (7th Edition). Prentice-Hall, New York.
Scarification
Scarification is aimed at altering the covering of the seeds, called a seedcoat, to admit air and water into the seed to initiate germination. Many perennials and woody plant seeds cannot absorb water or have seedcoats that exclude oxygen and other gases from the inner parts of the seed; scarification treatment for these seeds can speed germination. Scarification methods include mechanical filing, abrasion with sandpaper, hot/boiling water, or chemical erosion with concentrated sulfuric acid (Fig. 16), each of which should be conducted carefully to avoid seed damage. Suggested methods for individual seeds may be found on seed packets or in reference books. Mechanical scarification involves selecting a place on the seed away from the embryo and cutting through the seedcoat until you begin to see cotyledons.
You can scarify some seeds by pouring hot/boiling water on them within a container, making sure not to boil the seeds themselves. Let the seeds sit in the water overnight and then decant. If you use acid for scarification, the seeds must be washed to avoid damage to the developing seedling and injury to the applicator.
Planting/sowing
Once you treat seeds to break dormancy, you can grow your woody plant seeds as described for vegetables and herbaceous ornamentals. Either start them indoors for later transplanting or plant them directly outdoors as directed on the label. See Table 4 for suggestions on handling selected woody plant seeds.
References
This publication provides information about seed propagation at an introductory level suitable for a home gardener. Those who are interested in knowing more about propagating plants are encouraged to refer to the following publications:
- Bienz D.R. 1980. The why and how of home horticulture.
W.H. Freeman and Company, New York. - Dirr M.A. and C.W. Heuser Jr. 1987. The reference manual of woody plant propagation: From seed to tissue culture. Varsity Press, Inc., Athens, GA.
- Hartmann H.T., D.E. Kester, F. Davies, and R. Geneve.
2001. Plant propagation: Principles and practices (7th Edition). Prentice-Hall, New York. - Maynard D.N. and G.J. Hochmuth. 1997. Knott’s handbook for vegetable growers. John Wiley and Sons Inc., New York.
- Toogood A. 1999. Plant Propagation: The fully illustrated plant-by-plant manual of practical techniques.
American Horticultural Society. DK Publishing, Inc., New York.
Published and distributed in furtherance of the Acts of Congress of May 8 and June 30, 1914, by Washington State University Extension, Oregon State University Extension Service, University of Idaho Extension, and the U.S. Department of Agriculture cooperating. WSU Extension programs, activities, materials, and policies comply with federal and state laws and regulations on nondiscrimination regarding race, sex, religion, age, color, creed, and national or ethnic origin; physical, mental, or sensory disability; marital status or sexual orientation; and status as a Vietnam-era or disabled veteran. Washington State University Extension, Oregon State University Extension Service, and University of Idaho Extension are Equal Opportunity Employers. Evidence of noncompliance may be reported through your local Extension office. Trade names have been used to simplify information; no endorsement is intended.
Pacific Northwest Extension publications contain material written and produced for public distribution. You may reprint written material, provided you do not use it to endorse a commercial product. Please reference by title and credit Pacific Northwest Extension publications.
Order Information:
WSU Extension
Fax: 509-335-3006
Toll-free phone: 800-723-1763
Email: ext.pubs@wsu.edu
OSU Extension
Fax: 541-737-0817
Toll-free phone: 800-561-6719
Email: puborders@oregonstate.edu
UI Extension
Fax: 208-885-4648
Phone: 208-885-7982
Email: calspubs@uidaho.edu
Copyright © Washington State University
Pacific Northwest Extension publications are produced cooperatively by the three Pacific Northwest land-grant universities: Washington State University, Oregon State University, and the University of Idaho. Similar crops, climate, and topography create a natural geographic unit that crosses state lines. Since 1949, the PNW program has published more than 650 titles, preventing duplication of effort, broadening the availability of faculty specialists, and substantially reducing costs for the participating states.