Growing Onions in Home Gardens (Home Garden Series)

Description

It’s not difficult to grow onions in Washington gardens, but understanding how they grow is key to success. This publication provides information to Washington gardeners on the basics of growing bulb ...


SKU:
FS097E
Published:
December 2013
Tan-colored onion.

Introduction

It’s not difficult to grow onions in Washington gardens, but understanding how they grow is the key to success. Garden onions (Allium cepa) are biennial plants. This means an onion plant takes two growing seasons to go from seed to flowering. Onions grow vegetatively the first season, forming a bulb for storage at the end of the first season. That bulb then provides the plant with energy for growth, flowering, and seed production the next season.

Bulbing onions are harvested the first growing season before the plants flower and go to seed in the next season. Green onions are also harvested during the first season before a bulb fully develops. Scallions are young onion plants that are harvested before the bulb starts to form. Green onions and scallions have a milder onion flavor because the onions are not fully mature when harvested.

Selecting Types to Plant

Onions form bulbs in response to day length or the number of hours of daylight. There are two main types of onions: those grown in northern latitudes that bulb in response to long days, and those grown in southern latitudes that bulb in response to short days. The long-day onions grown in Washington will start to bulb when there are 14 hours of daylight. If they are not planted early enough in the spring, bulbing will begin before the plant grows enough to produce a large bulb. When purchasing onion seed, Washington gardeners should be sure to select only long-day onion cultivars.

Choosing a Planting Site

Onions grow best in well-drained, fertile, sandy-loam to silt-loam soils that have high levels of organic matter. However, they will tolerate a range of mineral soils. They prefer slightly acid soils, but will tolerate those that are slightly alkaline. Onions are shallow-rooted and require evenly moist soil on a consistent basis. It would be wise to plant onions close to a source of water in the home landscape.

Planting Guidelines

Early planting is critical if you plan to harvest and store dry bulb onions. It’s easiest to grow onions starting with “sets” that were grown from seed the year before. Sets are harvested in the fall and planted again early in the spring of the next year. Quality sets have a bulb at the base that’s smaller than a dime in diameter and dormant, firm, and healthy. Larger sets may flower early and fail to finish bulbing to produce dry onions for storage. These larger sets can be used for growing green onions. Sets are typically labeled as white, yellow, or red onions with no choice of cultivar. However, in some areas of central and eastern Washington, you should be able to find “Walla Walla sweet” onion sets.

Crop at a Glance

  • Growing season: Early spring-summer
  • Time of planting: Early spring
  • Spacing: 3–4 inches apart in rows spaced 12–15 inches apart. If planting in wide rows or beds, space plants using 4-inch centers or 4 inches apart. For green onions, space 1 inch apart.
  • Days to harvest (average range): Bulb onions from sets: 90–100 days; bulb onions from seed or transplants: 100–120 days; green onions from seed or sets: 30+ days.
  • Average yield: 10 pounds per 10-ft row
  • Common starting method: If dry bulb onions are desired, starting with sets or transplants is most successful. Green onions can be started from sets, transplants, or seed.

Sets should be planted in spring from March to early April. For dry bulb onions, plant sets 1 inch deep and 3–4 inches apart. If planting in rows, space rows 12–15 inches apart. If planting in wide rows or beds, place the sets using 4-inch centers. If you want small green onions, plant sets 1.5–2 inches deep and about 1 inch apart; farther apart if you desire larger green onions.

Onions can also be planted from seed or as transplants and typically are available in specific cultivars, giving the gardener more choices. When using seed, sow as early as possible once the danger of hard frost is past.

Plant seed 1/2 to 1 inch deep and 1.5 to 2 inches apart. When seedlings reach 3 inches tall, thin them to the desired spacing. Don’t allow the seed bed to dry out.

Seeds can also be started indoors and then transplanted to the garden when the seedlings are 3 inches tall. When starting them indoors, sow seed 4 to 8 weeks before planting outdoors.

Plant Maintenance

Onion roots are shallow, so keep the soil evenly moist. If the soil becomes too dry, the onions will form bulbs prematurely, resulting in small bulbs. Plantings should be kept as weed-free as possible because onions don’t compete well with weeds. Be careful when cultivating around the plants because of their shallow roots. An organic mulch can help control weeds and maintain even soil moisture.

Onions require large amounts of nitrogen, but excess nitrogen can cause problems, such as late maturity, soft bulbs, large necks, and shorter storage life. Before applying fertilizer, it’s advisable to test your garden soil to determine nutrient levels. Organic gardeners should incorporate nitrogen-rich organic matter into the soil prior to planting.

Pest Management

The most common insect problems are onion thrips and onion maggots.

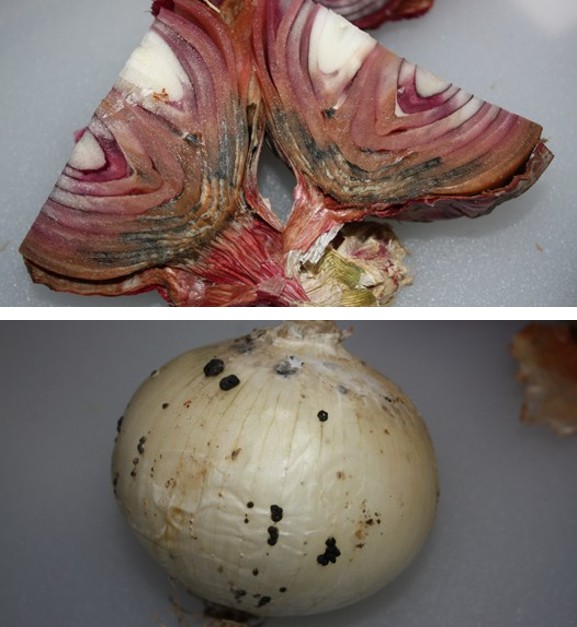
The most common disease problem is white rot. In 1986, the Washington State Department of Agriculture initiated a quarantine (WAC 16-470-300 through 340) on onion sets coming into commercial onion-growing areas in the Columbia Basin counties of Adams, Franklin, and Grant. Sets must be certified disease-free to protect these areas from white rot, a devastating fungus disease that remains in the soil for 25 years or more. If you live in these counties, purchase only certified disease-free onion sets from a reputable local nursery.

Common Problems

White, round flowers in a field of onion stems.

Bolting

Photo: H.F. Schwartz, Colorado State University, Bugwood.org
 
Symptoms: Plants send up flower stalks

Corrective Action: Plant small sets for bulb production; use plants from large sets for green onions.

Wrong Variety; bunching varieties do not produce bulbs.

Symptoms: Onions do not set bulbs.

Corrective Action: Plant correct bulbing cultivars for your region.
Diseased onion leaf with yellow streaks pulled back to reveal healthier underlayer.

Onion Thrips

Photo: Tim Waters
 
Symptoms: Leaves with silver streaks that later turn yellow, then brown; small black dots (excrement) on silver areas.

Corrective Action: See WSU Hortsense for management information.
White fuzzy mold on rotted, dark brown onion.

White Rot

Photo: Gary Pelter
 
Symptoms: Plants collapse; leaves and/or bulbs with white fuzzy growth specked with black bodies; bulbs with a soft, watery rot.

Corrective Action: See WSU Hortsense for management information.
Top Image: Purple-colored onion split in half, with black discoloration near neck. Bottom Image: Whole white-colored onion with black spots and brown discoloration.

Neck Rot

Photos: Tim Waters
 
Symptoms: Neck tissues appear water-soaked and yellow progressing down the bulb. A gray mold forms on the infected portions and hard, black fungal structures may be present, especially around the neck. Infected bulbs decay into a soft mass.

Corrective Action: White onions are most susceptible to this problem. Allow onion tops to mature before harvest. Do not knock or bend the tops over to encourage bulbing. Cure bulbs 6–10 days before storing. See WSU Hortsense for management information.
Green stem with fuzzy, rust-colored spots.

Allium Rust

Photo: Seth Lewis, WSU NWREC Vegetable Pathology Program
 
Symptoms: Leaves and stems
develop patches of reddish to dull orange; pustules develop on leaves (may later turn black). Leaves turn yellow. Bulb size and quality may be reduced.

Corrective Action: Usually most serious when onions are planted near garlic; rotate away from allium for 2–3 years.

Harvest and Storage

Dry onions grown from sets take three to four months to complete their growth. You will know they’re ready to harvest when most of the necks and tops have fallen over. Once this happens, the onions will not get any larger and should be pulled and allowed to dry in a shaded area with good air circulation. After the outer skin becomes dry and crispy, they can be stored in mesh bags in a cool, dry location. This should only take a few days if the weather is warm and dry. Sweet onions do not store well, but yellow onions, followed by red and white types, are best for storage.

Never try to encourage bulbing by knocking over the tops of onions yourself. This won’t stimulate bulb development or growth and can bruise the neck and lead to rot.

End Uses

Bulbing onions may be used fresh or stored. Bulbing onions and green onions can be chopped and frozen or dehydrated.

The University of Georgia hosts the National Center for Home Food Preservation website, which offers research-based recommendations for most Methods of Home Food Preservation.

Additional Reading

  • How to Grow Great Onions. Oregon State University Extension Service.
  • Pacific Northwest Vegetable Extension Group. 2013. Photo Gallery of Vegetable Problems: Onion/Allium.
  • Plant Onions in Early Spring for Biggest Bulbs. Oregon State University Extension Service.
  • Riofrio, M. and E.C. Wittmeyer. Growing Onions in the Home Garden. Ohio State University Extension Fact Sheet HYG-1616-92.
  • Tong, C. V. Fritz and T. Nennich. Growing Onions in Minnesota Home Gardens M1253. University of Minnesota.
  • Watch Your Garden Grow—Onion. University of Illinois Extension.

By Marianne Ophardt, WSU Benton County Extension.

Photos by author or as noted, by Tim Waters, WSU Franklin County Extension; and Gary Pelter, WSU Grant County Extension (retired).

Use pesticides with care. Apply them only to plants, animals, or sites as listed on the label. When mixing and applying pesticides, follow all label precautions to protect yourself and others around you. It is a violation of the law to disregard label directions. If pesticides are spilled on skin or clothing, remove clothing and wash skin thoroughly. Store pesticides in their original containers and keep them out of the reach of children, pets, and livestock.

Copyright 2013 Washington State University.

WSU Extension bulletins contain material written and produced for public distribution. Alternate formats of our educational materials are available upon request for persons with disabilities. Please contact Washington State University Extension for more information.

You may download copies of this and other publications from WSU Extension.

Issued by Washington State University Extension and the U.S. Department of Agriculture in furtherance of the Acts of May 8 and June 30, 1914. Extension programs and policies are consistent with federal and state laws and regulations on nondiscrimination regarding race, sex, religion, age, color, creed, and national or ethnic origin; physical, mental, or sensory disability; marital status or sexual orientation; and status as a Vietnam-era or disabled veteran. Evidence of noncompliance may be reported through your local WSU Extension office. Trade names have been used to simplify information; no endorsement is intended. Published December 2013.