Growing Roses in Washington State: Planting Roses
Description
Roses are arguably the most attractive flowering shrub in Washington State and a favorite of home gardeners. This publication offers information on how to successfully grow roses in most regions of t ...

Roses are arguably the most attractive and favorite flowering shrub of Washington State home gardeners. Roses can be grown successfully in most regions of the state, but proper site selection, soil preparation, plant choice, and planting are important parts of that success.
Site Selection
Generally, roses grow and bloom best when provided with full sun, although they will still perform satisfactorily when provided with a minimum of 6 hours of direct sunlight a day. When full sunlight is not available, morning sun is preferable to afternoon sun. This is so leaves that are wet from the morning dew will dry off quickly, decreasing the chance of fungal disease infection.



Grafted Roses
Many roses available to gardeners are grafted. This horticultural process involves taking a bud of a desirable rose cultivar and placing it onto the roots of species roses, such as Rosa canna or Rosa laxa. Species roses tend to have more vigorous root systems than the more desirable cultivated varieties (cultivars), resulting in stronger and more vigorous plants.
The location on the stem where the bud is placed is called the bud union (or graft). This will be a swollen area near the base of the plant (Figure1). Growth (canes, foliage, and blooms) that occurs above the union will be the desired cultivar.
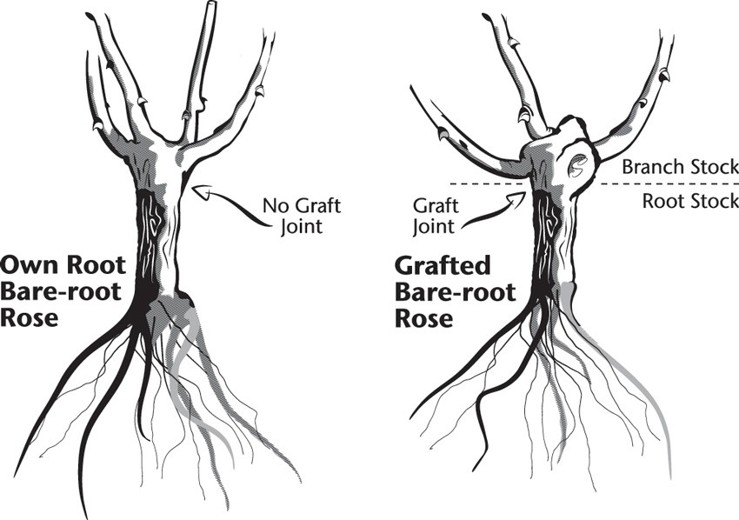
Sprouts or suckers that develop from below the union come from the rootstock. The species rootstocks usually have less desirable growth habits, leaves, and flowers than that of the desired top cultivar. When a rose plant seemingly changes flower colors, such as when a pink hybrid tea rose begins to have red flowers, it means the graft union has failed and the foliage and flowers can be attributed to the rootstock.
Own-Root Roses
Own-root roses are plants that are not grafted. These are plants of desirable cultivars that are started from rooted cuttings and grown on their own roots. Because there is no graft, there is no swollen area or bud union at the base of the plant (Figure 1).
When gardeners decide to plant roses, understanding the advantages and disadvantages of grafted versus own-root roses will increase growing success. Table 1 summarizes the advantages and disadvantages of both grafted roses and own-root roses.
There are three grades of grafted bare-root roses, 1, 1.5, and 2. The grade should be indicated on the package or in the catalog. Grade 1 roses are 2-year-old plants with three or more strong canes. A balanced plant with evenly spaced canes is best. Grade 1 roses are considered the best grade and will be the most expensive, but are the most likely to thrive. Grade 1.5 roses are also 2-year-old plants with at least two strong canes. Grade 2 plants must have two canes, but these tend to be weaker plants that should be avoided.
Table 1. Advantages and disadvantages of grafted and own-root roses.
| Grafted Roses Advantages | Grafted Roses Disadvantages | Own-Root Roses Advantages | Own-Root Roses Disadvantages |
|---|---|---|---|
| Depending on the cultivar, tend to be more vigorous with more flowers. | Rootstock may send up suckers that have different flowers and leaves than the desirable top cultivar. | If killed back to the roots by winter damage, regrowth from the root system will be the same cultivar. | Depending on cultivar, tend to be less vigorous. |
| Are generally more vigorous and can be grown to a desirable size more quickly, as a result they tend to be less expensive than own-root roses, which stay in the nursery longer to develop an adequate root system and stronger plant. | Rootstock will usually takeover when top of plant and graft are killed by winter temperatures. | Suckers that come from roots will be the same cultivar as planted. | Depending on cultivar, tend to have poorly developed root systems. |
| Tend to have a better, more developed root system. | Potential incompatibility between the rootstock and top cultivar can result in poor plant performance or the loss of the top cultivar. | Plants tend to be longer-lived than grafted roses. | In the nursery, the plants take longer to produce an adequate size plant with a good root system, making the plants more costly to produce. |
| May be the only way to commercially produce some cultivars that have very weak root systems. | Greater chance of introducing virus diseases to plant by not using clean tools for grafting or not using virus-free rootstock. | - | - |
| - | Grafted plants tend to be shorter lived. | - | - |
Grafted Roses: Most modern rose cultivars are grafted onto rootstocks, but an increasing number of producers are offering the same cultivars as own-root roses.
Own-Root Roses: Most heirloom or old garden roses are grown on their own roots. David Austin roses are primarily grafted, but some are becoming available as own-root roses.
Purchasing Roses to Plant
Roses can be purchased from a wide variety of sources, including mail order companies, local nurseries and garden centers, hardware and big box stores, and even grocery stores. Plants are usually sold as bare-root plants in packages, individually potted plants, or boxed. Each are handled and planted somewhat differently. Potted plants are available at nurseries throughout the growing season. They are best planted early in the growing season to help establish root growth before the heat of the summer months. Bare-root plants are dormant plants that should be planted in early spring before new growth begins.
Bare-Root Roses
Bare-root roses are dormant plants with their roots packed in various types of moist packing materials, such as sawdust, peat, or sphagnum moss. The canes of bare-root roses should be green, not shriveled, and have green buds that have not begun to swell. Sometimes, the canes and buds will be coated with wax to prevent drying. This wax will usually break down and slough off with time once the plant begins to grow. Do not attempt to remove it.
Examine the roots in the package, and look for plants with well branched, fibrous root systems. When purchasing plants from a retail outlet, avoid any that are no longer dormant and have new growth sprouting. This shoot growth uses stored carbohydrate resources and limits resources available for potential root growth and establishment.
Have the planting bed or holes ready when bare-root roses arrive. Whether purchased locally or mail-ordered, plant bare-root roses as soon as possible. If it will be a day or two before planting, the plants should be stored in a cool (40 degrees), dark location so they will remain dormant. Also, check the packing material to make sure the roots are still moist.
Planting Bare-Root Roses
When ready to plant, carefully remove the packaging and the packing materials from around the roots. Soak the roots for a period of several hours (but no more than 12 hours) in a bucket of clean, tepid water. Immediately prior to planting, remove the plant from the water and trim the roots using clean pruning shears to remove any dead, damaged, or broken roots. Prune broken roots just above the break. Cut back any extra-long, straggly roots to a length of no less than 10 inches.
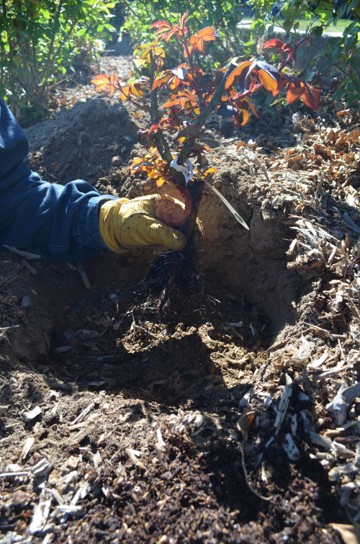
The planting hole should be wide enough and deep enough to comfortably accommodate the root system (Figure 2). A hole 24 inches wide and 12 inches deep is generally adequate, but should be no deeper than the distance from the bud union to the base of the roots. Before placing the bare-root plant in the planting hole, place a mound of soil in the bottom hole to make it easier to place the plant.
Rotate the plant so that the larger canes are facing the backside of the bed and the smaller canes are facing forward. As you place the plant on the mound of soil in the hole, spread the roots out evenly over the mound.
The depth of planting is dependent on the climate in each region of the state. In milder regions of the state where winter injury to roses is not usually a concern, the bud union at the base of grafted plants should be at soil level. In colder parts of the state (USDA Plant Hardiness Zones 7 and below) where winter temperatures predictably drop below 20 degrees, the graft should be 1 to 2 inches below the soil. Bare-root own-root roses should be planted at the same level that they were growing in the nursery, with the roots just below the soil.
Fill 2/3 of the planting hole with the original soil that was removed from the hole. Stop and add enough water to fill the hole and then let the excess water drain. Fill the hole completely and water again to help settle the soil around the roots and remove any air pockets. Do not press down or firmly on the soil when wet, as this compacts the soil and forces the oxygen out of soil pores.
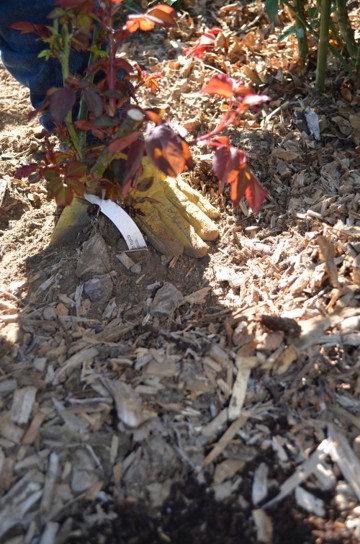
The final step in planting bare-root roses is to mound soil or mulch over the base of the plant, covering the lower half of the shrub. This prevents the canes from drying out. Keep the soil or mulch moist until new growth begins in several weeks. Once shoots and leaves begin to develop, carefully remove the mound (Figure 3).
Planting Potted Roses
Potted roses are bare-root roses that nurseries have planted in pots with soil medium in late winter or early spring and then grown in a greenhouse. This way the plants will have leaves and possibly even flowers when purchased. Because the leaves of these plants will be tender, do not plant potted roses until the danger of frost has passed.
Plant potted roses basically like any other flowering shrub in the landscape. The hole should be twice as wide, or more, than the root ball and only deep enough to accommodate the root ball.
Remove the pot before planting and gently loosen the roots, then remove as much of the media as possible. Encircling roots should be cut off if they cannot be loosened from the soil ball. If grafted, the graft should be the same as indicated for bare-root roses. Plant own-root roses at the same level they were in the nursery.
Planting Boxed Roses
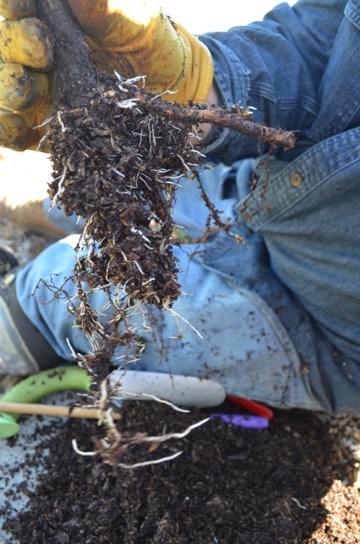
Sometimes roses are offered for sale with their roots boxed, along with directions to plant the rose with the box and all. Experts recommend against planting roses in boxes because the plant will not establish as quickly as bare-root or potted roses. This is because the box must decay before the roots can grow out into the surrounding soil. In the drier areas of the state, boxed roses fail for many gardeners because it takes too long for the box to decompose. Remove a boxed plant from the package and any media surrounding the roots and simply treat like a bare-root rose (Figure 4).
Care Immediately After Planting
After the soil is settled and the planting is complete, check to make sure the bud union of grafted plants is at the recommended placement. It is important to have the graft at the desired depth. Replant if necessary.
The next step is to prune any damaged or broken canes to below the injured area. On dormant, bare-root plants, prune canes back to a length of 6 to 8 inches, leaving at least three to five buds per cane. Prune off ends of canes that were shredded by mechanical pruners. When pruning, it is best to prune back to an outward facing bud. Make the pruning cut 1/4 inch above the bud at a 45 degree angle sloping away from the direction the bud is pointing.
After Planting
Whether bare-root or potted, remove any wires or tags still on the plant. Wires that are left on for several growing seasons may girdle the stem, causing damage. Check the soil moisture frequently, being sure to keep the soil in the root zone slightly moist so the roots can grow and become established.
Further Reading
- Cogger, C. 2005. Home Gardeners Guide to Soils and Fertilizers. Washington State University Publication EM063E. Washington State University.
- Cogger, C. 2010. Collecting a Soil Sample. Washington State University, Video.
- Cogger, C. 2012. Raised Beds. Washington State University Publication FS075E.
- D.A. Horneck, D.M. Sullivan, J.S. Owen, and J.M. Hart. 2011. Soil Test Interpretation Guide. Oregon State University Publication EC 1478.
- Kumar, M. 2011. Propagation of Plants by Grafting and Budding Pacific Northwest Publication 496E. Washington State University.
- Ophardt, M., and R. Hummel. 2011. Planting Trees and Shrubs in the Landscape. Washington State University Publication FS047E. Washington State University.
- University of Illinois Website. Our Rose Garden.
- USDA Plant Hardiness Zone Map.
By Marianne Ophardt, Director, WSU Benton County, Sheila Gray, Director, WSU Lewis County
Use pesticides with care. Apply them only to plants, animals, or sites as listed on the label. When mixing and applying pesticides, follow all label precautions to protect yourself and others around you. It is a violation of the law to disregard label directions. If pesticides are spilled on skin or clothing, remove clothing and wash skin thoroughly. Store pesticides in their original containers and keep them out of the reach of children, pets, and livestock.
Copyright 2015 Washington State University.
WSU Extension bulletins contain material written and produced for public distribution. Alternate formats of our educational materials are available upon request for persons with disabilities. Please contact Washington State University Extension for more information.
Issued by Washington State University Extension and the U.S. Department of Agriculture in furtherance of the Acts of May 8 and June 30, 1914. Extension programs and policies are consistent with federal and state laws and regulations on nondiscrimination regarding race, sex, religion, age, color, creed, and national or ethnic origin; physical, mental, or sensory disability; marital status or sexual orientation; and status as a Vietnam-era or disabled veteran. Evidence of noncompliance may be reported through your local WSU Extension office. Trade names have been used to simplify information; no endorsement is intended. Published August 2015.